If you go to Ryuzine Press > Options you’ll see several tabs for global configuration of your Ryuzine Press Editions.
Cover Settings
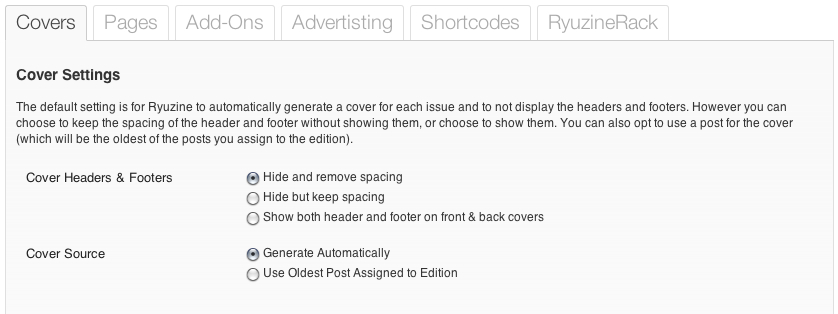
Cover Headers & Footers
You have three options for what to do with the front and back cover Headers and Footers:
- Hide and remove spacing – This is the default setting allowing for a more “magazine-like” appearance.
- Hide but keep spacing – suppresses the display of the header and footer content, but keeps their heights as top and bottom margins.
- Show both Header & Footer – if you prefer a more newspaper/newsletter style format, and especially if you are using a post as your cover, this will show both headers and footers.
Cover Source
The default setting is to “Generate Automatically” which takes your Masthead settings and Featured Articles posts to construct a cover page with a list showing the titles of the featured posts (if any) that are also active links to their page within the Ryuzine Press Edition.
Alternatively you can opt to show the oldest post (of those assigned to the edition) as the front cover. This may be preferable for a more newspaper/newsletter type presentation. You may also want to do this for webcomics if, for example, each volume/chapter/issue begins with a “cover art” style post.
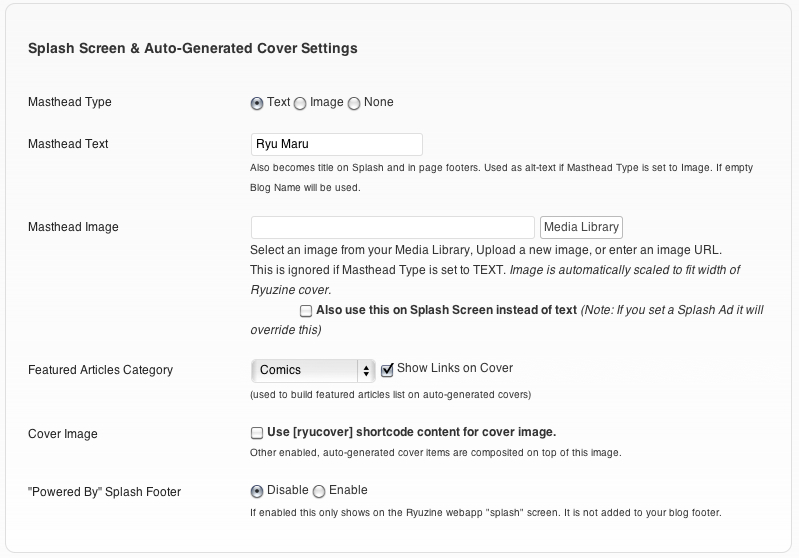
If you set the Cover Source to generate the cover automatically for you then the settings in the “Splash Screen & Auto-Generated Cover Settings” section are used:
Update: New with version 0.9.6.8 you can select whether the auto-generated covers should prefer an image inside of the shortcode or if it should use the “Featured Image” attached to the Edition. You can also change this in the Custom Configuration settings for each Edition.
Mastheads
The next section deals with the Masthead settings for automatically generated covers. You can go with just plain text if you like, or use an image.
Text – If you do not opt to use a Masthead Image this will be the text on the cover of your Ryuzine Press Edition. Enter the text in the “Masthead Text” box (the Blog Title is automatically inserted for you). This text is also used on the webapp’s “Spash” screen and in the footers of pages next to the page numbers.
Image – is optional and you can select anything in your WordPress Media Library with the button next to the “Masthead Image” entry field. There is also a checkbox allowing you to use this image on the webapp’s “Splash” screen instead of text (note that if you set a “Splash Ad” it will over-ride the Masthead Image in favor of the advertisement).
None – means you do not need a masthead of any kind composited onto your cover.
Featured Articles
You can also have Ryuzine Press automatically generate a set of “featured” links on your cover. Select the category from the drop-down list and then tick the “Show Links on Cover” box. The FIVE most recent post in the selected category will have their titles shown on the cover as links to the page on which those posts appear within the Ryuzine Press Edition.
Cover Image
If you already have an image you’d prefer to use as your publication’s cover art you can tick the box. Then, in the Ryuzine Press Edition post simply place the image you want to use in between the [ryucover]… shortcode. If you are also using the optional Ryuzine Rack newsstand that same cover image is used for the thumbnail there.
The shortcode also accepts parameters that control the background color and coverage settings for the image without having to add it to your issue-specific stylesheets (see the section of this manual on “Shortcodes” for full details).
Powered By Splash Footer
If you would like the words “Powered By Ryuzine Press” to appear in the footer area of the Splash Screen “Enable” this option and show our webapp and plugin some love!
App Logo & Icons
![]()
The “App Logo” is an image used on Reader navbar on phones and on the Rack navbar for all platforms, which allows you to “brand” the navbar with your own logo or icon (note: Rack catalogs can over-ride this with catalog-specific branding).
The Ryuzine webapp is coded to use an “App Icon” if it is bookmarked to the home screen on iOS and Android devices. Many other browsers will use the “favicon” in the address bar and if the Ryuzine publication is added to the browser’s bookmarks.
This section of the Options allows you to custom “brand” your Ryuzine Press Editions with your own icon or logo. Select an appropriate image from your Media Library and “Save” the changes. You will see previews of the images scaled to the required sizes (no App Logo is set so it is blank):
![]()
Reset to Defaults
You’ll also notice there is a checkbox at the bottom of the Options section that says “Reset to Defaults on Activation/Deactivation.” If you check this box and then go to the “Plugins” section and click “Deactivate” and then “Activate” under the Ryuzine Press plugin in the list it will clear all custom settings in the database and replace them with the original default settings upon initial installation of the plugin. Note: clicking the checkbox automatically submits the change to the database as well.
Important! When you update the Ryuzine Press Plugin you do not usually need to wipe your settings. However, if you don’t you’ll need to go through all the tabbed Options sections and make sure every options has some kind of selection, in case new options were added by the update they’ll need you to set them or the Ryuzine webapp may stop working until you do.