![]()
User Manual
Version 0.6
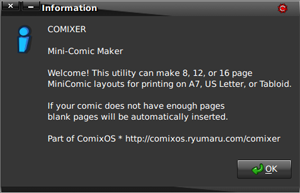
About Comixer
Comixer is a Linux shell script which works in conjunction with other programs to simplify and automate the process of formatting comic book pages without ever having to open other programs or know HOW to crop, scale, resample, archive, or convert images. Comixer will tell those other programs what to do based on the user's answers to simple formatting questions. Artists need only scan in their artwork (or supply original digital art files of pages), order the pages by name in a folder, select the pages in the Nautilus file manager, and run Comixer. If you can run a photocopier you can use Comixer to make digital comic books.
Comixer's Automated Features
- Cropping of scanned artwork to Bleed, Trim, or Live Area dimensions.
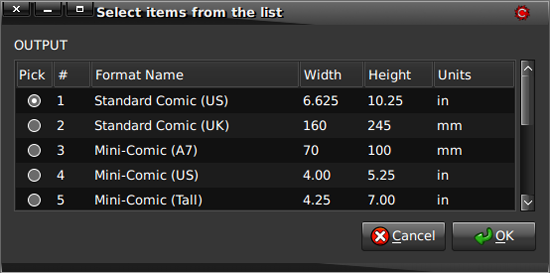
- Conversion of pages to or from any one of 18 pre-defined formats (plus an option to enter your own custom size).
- Change document color space from RGB to CMYK to Grayscale
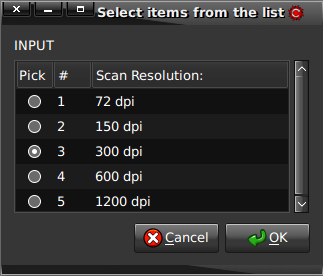
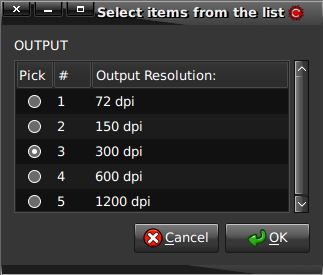
- Resample artwork to/from five resolutions: 72, 150, 300, 600, or 1200 dpi
- Output files to Image Files (TIFF, PNG, or JPEG), CBZ Digital Comic Archive (DCA), or PDF
- Create Comic Book Covers including:
- Wrap-Around covers, both perfect-bound and saddle-stitched
- Automatic creation of spines or distortion of an image to fit calculated spine width
- Automatic creation of space and compositing of ISBN barcodes to back cover or ISSN barcodes to front cover
- Automatic creation of a front cover "badge" featuring Issue, Volume, and Price information
- Automatic scaling and placement of a Logo graphic on front cover art.
- Automatic creation of Indicia on first page from an external text file
- Splitting scans of two-page spreads of facing pages into individual pages (great for converting assembled comics into Digital Comic Archives!)
- Insertion of .nfo and signature graphics, as well as automatic file name formatting, for Digital Comic Archives
- Pagination/Imposition of Mini-Comics for printing on A4, US Letter Mini, US Letter Digest, and US Tabloid - any number of pages (both "cut & fold" and "fold & cut" methods of assembly).
- Presets for common/popular conversions (with ability to add more by editing the script)
System Requirements/Dependencies
- Linux Operating System
- Nautilus File Manager
- ImageMagick
- Ghostscript
- Zenity
- Zip
Comixer was designed as part of the ComixOS Linux distribution. If you'd like to install it on other Linux distributions refer to the Technical Notes at the end of this document.
File Preparation
While you do not need to know how Comixer does what it does, you do need to take care in preparing your files to achieve the best possible results.
Scanning Images
When you are scanning comic book pages, do your best to CENTER the images. This is critical, as Comixer will assume the most important part of the image is the middle!
Most scanning software allows you to PREVIEW your scan before actually digitizing it. You are then usually presented with a "marquee" boundary box you can use to adjust what portion of the image will actually be scanned, and some scanning programs also automatically size the marquee around what it believes is the main content. This is the best place to eliminate as much extra space around the portion of the image you want to retain. If it is centered, however, cropping off any extra space isn't necessary since the first thing Comixer does is trim a copy of the scanned image to the appropriate size (depending on whether you've told it the scan represents the Bleed, Trim, or Live Area). However, if you are scanning at 1200 dpi an entire book of pages will create many, large files. You can help reduce the file sizes by making sure the images don't contain anything other than what you want.
Your scans do NOT all have to have the same dimensions! As long as the dimensions of the important content are within the size you indicate as the "Input" format, Comixer will crop/border all the images as needed so that they are all the same size.
When you are scanning the images is also a good time to adjust the brightness, darkness, or contrast to get the best quality image.
Creating Images
If you create your work digitally the process is much simpler. All you need to do is create, scale/crop, or export your work at one of the 18 comic book sizes in Comixer, and put one image for each page in a folder for processing. Just as with scanning, your source images should be either at, or above, the ultimate output resolution for your comic book.
Image Resolution
Your source images should always be at least, if not greater, than the eventual output resolution. You can downsample images to lower resolutions and still have acceptable results, but you cannot upsample a low resolution image to a higher resolution without significant loss of quality! The reason is that downsampling throws out some image data, which is fine since the higher resolution image has more image data than the lower resolution image. But upsampling cannot manufacture data that does not exist in the original image, the lower resolution image doesn't have any more data to contribute! If you are uncertain what resolution may be appropriate for your application here is a general guide:
- 72 dpi: suitable for images on the web and low resolution offline viewing on a computer screen.
- 150 dpi: the preferred resolution for DCA's and draft resolution for printing on home printers
- 300 dpi: preferred resolution for high quality printing on home printers, also preferred by most Print On Demand services, minimum acceptable resolution for most professional printers.
- 600 dpi: preferred high-resolution for black and white/line art (such as Manga) by Print On Demand services, preferred resolution for professional printing
- 1200 dpi: high resolution "photo" printing, high-detail full color artwork with some printers, black and white line art for professional printing
If in doubt you should use the default settings of input and output at 300 dpi. All of your images MUST be the same resolution.
File Names
When you create your folder full of image files they should have file names which naturally put them in the correct order. It is recommended that you do NOT simply use numbers for file names! Comixer makes copies of all your image files, and in the process will rename them so it can work with them more easily, and if you only use numbers it is possible to confuse Comixer (see Technical Notes for why). If you choose to ignore this advice and name your files with numbers at the very least don't ever use only zeroes for the file name of the first images! For example "00.png" or "000.jpg" will definitely cause problems. Instead it is recommended that you include some additional and consistent information in the file names, such as the title of the comic book or volume and issue number THEN add the page number. Also if the book will be longer than 9 pages (most will be) you should number pages in the format of 01, 02, 03, etc. (for books under 100 pages) or 001, 002, 003, etc., (for books over 100 pages). This will assure that, when you organize the files by name, they will appear in the correct order. Examples of improper and proper file naming:
0.gif, 00.png, 000.jpg - Never use just zeroes for the file name of the first image!
01.png, 02.png, 03.png - Acceptable, but not recommended
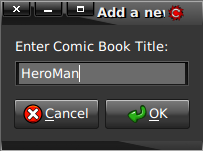
HeroMan-000.jpg, HeroMan-001.jpg, HeroMan-002.jpg - Preferred (notice zeroes CAN be used, so long as they're not the only thing in the file name!)
Vol1-Iss4_01.png, Vol1-Iss4_02.png, Vol1-Iss4_03.png - Preferred format
Covers
Normally in printing covers are not part of the same file as the rest of the book. Why? Because they are usually run as a seperate job and printed on different paper or coverstock. This is why it makes sense for you to start your files with page 1 of your book, as the cover would most commonly be another file by itself. However, if you are creating a "readers' spread" (the way it will appear for a reader), such as in a Digital Comic Archive, Mini-Comic, or a PDF for web viewing, in those situations you may want to include the front and back covers. It is in those situations you might opt to name the front cover with a "00" (zero-zero) in the name, and that is fine, so long as that's not ALL there is to the file name. Obviously, then, the back cover would be the last page.
Inside Front & Back Covers: Comixer has no way of knowing if an image file is a cover or a page, so if your comic book includes content on the interior faces of the front and back cover simply name the files so they fall in the correct places. For example to keep cover images in the right place, but indicate they are cover art with zeroes in the file names:
HeroMan-00.png (front cover)
HeroMan-00a.png (inside of front cover)
HeroMan-01.png (first/splash page)
. . . (interior pages)
HeroMan-28.png (last page)
HeroMan-x00.png (inside back cover)
HeroMan-z00.png (back cover)
Of course you could also just name the files with consecutive numbers. Exactly how you choose to organize your source files (other than not using just zeroes for the first file name) is up to you, so long as they arrange by name in the correct order.
Note: the CoverCreator currently is not capable of creating a single file with both inside and outside cover art. However, you can generate two files, one for each side and use a PDF utility to combine them into a single file if that's what your printer wants.
Getting Started
Regardless of what operation you are performing on your comic book pages, the start-up process will be the same:
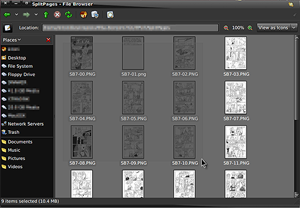
- Open the folder containing your source images.
- Select the files you want to process (typically this would
be all of them, so a nice shortcut is to click in an empty area of the
file window and press CTRL+A to select them all.
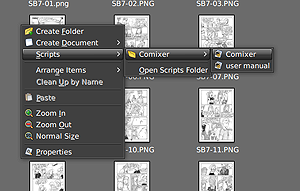
- Right+Click and select
"Scripts->Comixer->Comixer" to run the program
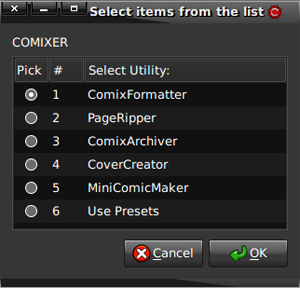
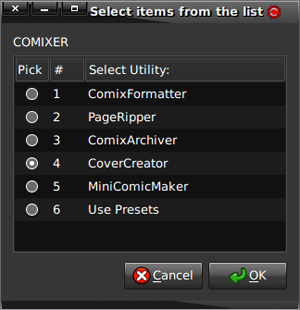
- The first thing Comixer will ask you if what utility you
want to run, the options are:
 Using Presets
Comixer includes some handy "Presets" for processing your files. These include the settings for various Print On Demand services, publishers, and Digital Comic Archives. By using the presets you can avoid having to enter (or remember) the manual settings. Simply select your files, select your preset, and Comixer goes to work. You can also add your own custom presets by editing the Comixer script (see Technical Notes section for details on how to do that).
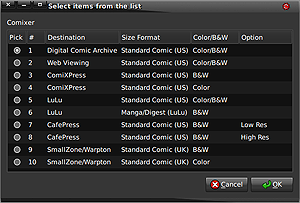
Please Note: This feature - like Comixer itself - is experimental! The use of a service or publisher's name in the preset does not mean a file generated with that preset will be acceptable to that service or publisher! It simply means those settings, in theory, should produce a file which meets that organization's requirements. If you create files with Comixer for submission to those organizations, please provide feedback at http://dab.ryumaru.com/ regarding whether your files were accepted or rejected (and why, if known). Your feedback can help improve future versions of Comixer!
 ComixFormatter
ComixFormatter is the core of Comixer, as all the other utilities also use it to process files. With ComixFormatter you can convert your scans from any one of the 18 comic book formats to any of the other comic book formats, also changing the colorspace and resolution if necessary. Output may be images, a CBZ Digital Comic Archive (DCA), or PDF file. The typical workflow is as follows:
- If you just want to run the formatter select ComixFormatter
from the list. However, if you select other utilities they run the
formatter utility first so you'll see most of these same options
regardless of which utility you've chosen to run.
- You are asked for the scan, or source image, resolution.
This is typically whatever image density you chose when scanning or
creating your source images.
- Comixer then asks you what the Artwork Represents:
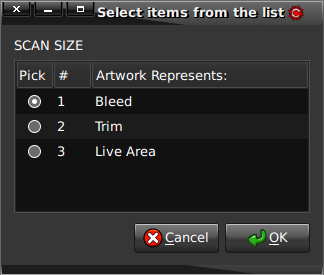
- Bleed: The image includes content that will be trimmed off. Typically used if you want artwork to extend to the edge of the trimmed page. The image is slightly larger than the book's dimensions.
- Trim: The image contains ONLY the artwork that goes to the edge of the trimmed page (which is the final dimensions of the book)
- Live Area: The image contains ONLY the artwork that is important - the portion with key action, dialog, or lettering. It is SMALLER than the book's dimensions.
- You then tell Comixer what comic book format the scans, or
source images, are. You most likely drew your comic book with some
specific book dimensions in mind, simply find that size (or the closest
to it) on the list.
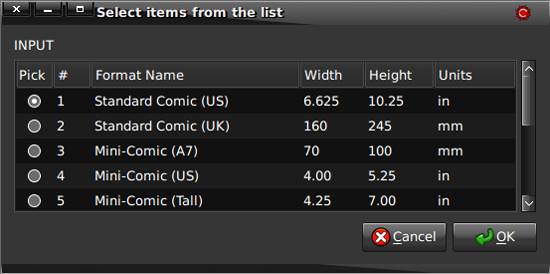
Comixer then asks you what you want it to create for you! Some of this may seem a little repetitous, but it also means once you've done it a couple of times it will be quite easy. - USING CUSTOM SETTINGS - the 19th option is to input your own custom format.
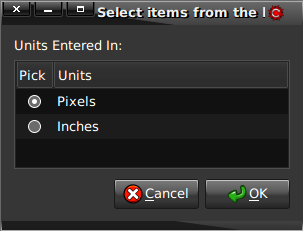
- Tell Comixer if you are entering values in Inches or Millimeters, which are the most common paper/book sizes.
- Comixer will ask you for the TRIM WIDTH and TRIM HEIGHT. It only asks for the "trim" because those are the dimensions you're most likely to know, as it represents the final size of the book/page. Comixer will then automatically calculate the Bleed and Live dimensions using the most common margins. You should, however, be aware these may not be the ACTUAL margins for the custom size you enter. If you require the ability to enter actual Bleed and Live margins, change the Global Variable at line 66 from zero to "1" to enable custom dialogs for entering Bleed and Live sizes.
- Depending on the task you are performing you may, at this
point, be asked if you want to include an "Indicia" on the first page
of your comic book:
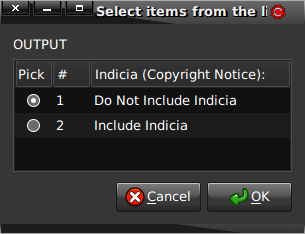
If you select "Include Indicia" you will then be asked whether the files you are processing include the cover or not. Comixer needs to know whether the Indicia should be added to the bottom of the first file (if the cover is not part of your selection) or on the second file (which should be Page 1 if you included a cover).
"Indicia" is a block of text traditionally appearing on the first right-hand page after the cover. This block of text usually contains the official name of the publication, its publication date, information regarding editor, as well as a disclaimer regarding unsolicited submissions or story ideas, and in the case of comic books a notice that the content is not based on real people, places, or situations (unless, of course, they are). In recent years, placement of indicia has moved away from being exclusively on the first page. Since 2006, comic books commonly have indicia on the last page. Comixer will ask you whether you want it on the first or last page.
Then you are given a file dialog where you tell Comixer the location of your Indicia TEXT file. This must be a plain text file, which Comixer will read and then word-wrap the text into the alotted space. If you want to force any carriage returns you'll need to use the "\n" (forward slash and lowercase "n") in your text. You should remember to leave space on the first or last page of your comic for an indicia if you intend to include one. If you're not sure how much space to leave, you can do a "test run" with Comixer and a mock-up page the same size as your comic to see how much space your indicia text occupies. - You are asked what the output resolution will be. This may
be the same, or lower, than your Input Resolution. It shouldn't be
higher, though the program will allow it upsampling is not recommended.
- You are then asked what size the book pages Comxier creates
should be. This is the same list as the 18 options under "Input," and
you can select the same size if your artwork does not need to be scaled.
- If you told Comixer the Artwork represented the "Bleed"
dimensions, it will then ask you what you want it to DO with that Bleed
allowance:

- Keep the Bleed - which is typically done if you are sending the file for printing, where it will be physically trimmed off the edges of the paper once printed.
- Trim it off - which is typically done if you are creating a "reader's spread," such as a DCA or PDF for web viewing where you want what the viewer sees to look like the finished (trimmed) book.
- You can then select the Color Space. Sometimes color space
conversions are necessary, depending upon the use of the file you are
creating:

- RGB - this is used for files that will be viewed on a computer monitor. However, some Print On Demand services require RGB files and will convert them to CMYK themselves. RGB contains the most color data and provides the richest colors.
- CMYK - this is the standard used in printing, and refers to the four process inks used in offset printing. Because it is only capable of reproducing 5000 colors it cannot reproduce all the colors present in an RGB image, but has to approximate them. Some Print On Demand services prefer to do this color conversion themselves, other printers will only accept CMYK files for color books.
- Grayscale - Color is
expensive, so in some cases you may want to convert your color artwork
to gray tones to save money on printing, since Grayscale only uses one
ink - BLACK. Many independent comic books are also produced with
grayscale in mind, in which case you may want to use this colorspace.
However, again, some printers prefer you send them RGB or CMYK files as
they prefer to convert them with their in-house tools to assure highest
quality. Which means, even if you produced your work in grayscale or
black and white, you may still be asked to send a RGB or CMYK color
file.
As you can see, it is VERY important you know which color space your printer wants from you! This is where some of the preset configurations can save you time since the known requirements are already entered.
- Depending on whether you are running ComixFormatter alone,
or if it is being run by another utility, you may also be asked which
file format you want for the output:
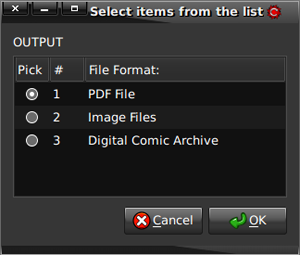
- PDF: This is the most common, since it is the preferred document format used by print shops
- TIFF: This is the only image format a print shop is ever likely to want to see submitted to them. If they won't accept a PDF odds are they'll accept these.
- Digital Comic Archive: Creates a DCA zipped "*.cbz" file for use with Comic Reader software.
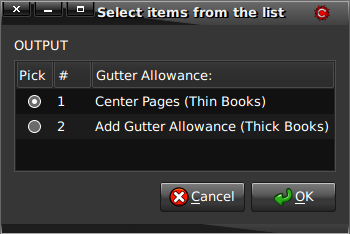
- You may then also be asked whether or not you want to
include a "Gutter Allowance." If a book is particularly thick the
artwork might be so close to the spine that you can't open the book far
enough to see the inner edge of the artwork, at least not without
"cracking the back" of the book and breaking the spine! A "Gutter
Allowance, " alternating on each page, pushes the artwork away from the
spine - which effectively pushes the "Live Area" (the important
artwork) closer to the outside Trim edge, and crops some of the Trim
off. If you add a Gutter Allowance it is all the more important that no
important part of your artwork strays outside of the Live Area! Thinner
books don't have this issue, so the artwork can usually just be
centered on each page.
Comixer assumes if you are adding a Gutter Allowance you will actually be printing the book, in which case the front and back cover would be a separate file. In other words, Comixer will assume that the pages are all "inside" pages and no covers are included in the files being processed.
- Comixer interfaces with ImageMagick, which is capable of
reading and writing a wide array of image formats - so many it can be
overwhelming. Therefore Comixer only presents you with three options.
Whether you chose to output images only, or output a PDF file Comixer
will use whichever image format you select, however some are better
choices than others - depending on what you're trying to do, and each
has its own trade-offs. For example, if you are submitting a job to a
print shop you would probably want to use TIFF images in your PDF file.
However, some Print-On-Demand services have maximum file size
restrictions on PDFs uploaded to them, in which case TIFF images would
likely produce an image far too large to upload. It's likely you'd have
to use JPEG images in your PDF with compression to sufficiently reduce
the file size. Lastly, if you selected CMYK colorspace for your file
Comixer won't present you with the option for using PNG images because
(as a web image format) they do not support CMYK. However, if you are
producing an RGB file you may find PNG to be the best compromize
between quality and file size. It is likely you will have to experiment
a bit with these settings to find ones that work for your application -
thankfully processing your files with different settings is easy with
Comixer!
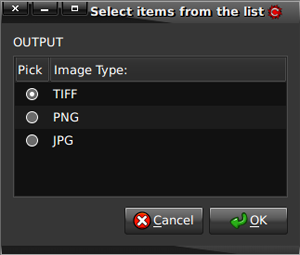
- TIFF - This is a high quality format which is a standard in the Printing Industry. It is the only image format many print shops ever want to see or will accept.
- PNG - Recommended format for output to the web or consumer printers.
- JPG - Recommended for best file size reduction, but has the worst quality of the three formats when compressed.
- You
are then asked if you want to use a Compression Method on the output
file. You can, of course, say no and you will get a full quality,
uncompressed file. However, sometimes these can grow rather large!
Also, some Print On Demand services have file size limits, so a method
and amount of compression may be necessary to comply with their
requirements. If you chose to output PNG files be aware that they
already use "lossless" compression, and "lossy" compression methods
(such as JPEG/JPEG2000) will simply be ignored if applied.
The
compression methods available are:
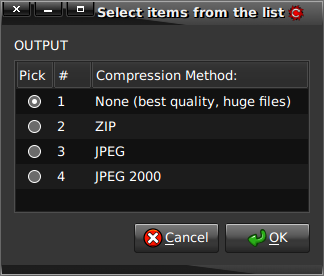
- None (produces the highest quality, but largest files)
- ZIP (usually the best option as it doesn't throw out any image data)
- JPEG (throws out image data, creates small files, but typically the worst quality of the available compression methods)
- JPEG2000 (better image
quality than JPEG, but not as widely used)
(see Technical Notes regarding how to enable LZW compression if you require that option)
- If you select any of the options other than "None" you will
then be asked how much compression Comixer should employ:
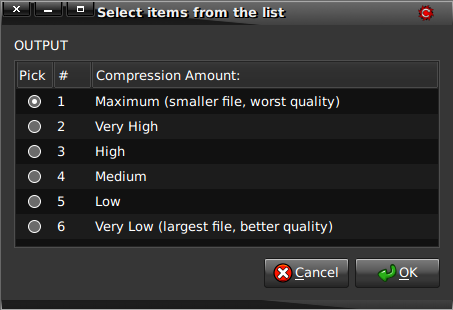
Many printing companies will state any compression level in the above terms, because that is what is used by Adobe® Acrobat® PDFs. This may initially seem confusing because one wants to assume "Maximum" refers to the quality of the image, since these same terms are ALSO used to refer to image quality in many image manipulation programs, which runs exactly opposite of this Compression list. Lastly, you may also encounter printers who simply tell you the Quality or Compression in terms of a percentage. Below is a table showing how these settings all equate to one another, so you can make an informed decision on the setting regardless of how the printer with which you are working has stated it:
| COMPRESSION AMOUNT | VALUE | QUALITY SETTING |
| Maximum | 0% | Very Low |
| Very High | 10% | Low |
| High | 25% | Medium |
| Medium | 50% | High |
| Low | 85% | Very High |
| Very Low | 100% | Maximum |
However, this is NOT the same as if you hadn't applied compression in the first place.
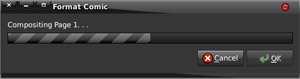
Processing Progress
If you ran ComixFormatter directly it should pop up a progress bar, and then dismiss it, for each operation it is performing. If another utility ran the formatter it may, instead, ask you function-specific questions of its own before starting to process the files.
If you selected "PDF" and have the Evince application installed it will be automatically opened with your completed file for inspection. If you prefer to use some other PDF viewer, refer to the Technical Notes to see how you can tell it to either not preview files or use your preferred application.
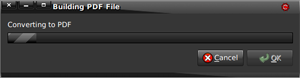
PLEASE BE PATIENT!
Processing your images and compiling them into a PDF file can take a LONG TIME, especially if your output is at one of the higher resolutions.
 PageRipper
PageRipper takes two-page spreads of facing pages and automatically splits them out into individual image files. From there you can also tell it to export them as TIFF images, a CBZ Digital Comic Archive (DCA), or PDF file. If you have assembled comics on hand which you wish to digitize, you may not want to pull the staples from a saddle-stitch bound comic, and certainly don't want to tear apart a perfect bound book! So, how do you digitize it? Simple! Use PageRipper.
Lay the book face down on the scanner so that you get a scan of two facing pages with each scan. Again, so long as they're as close to centered as possible, enter the size and resolution of the comic pages, then Comixer can then figure out where the center point is (the binding between the pages) and "RIP" them into two image files. Depending on your output options you'll either end up with a folder full of Image files, a compressed CBZ archive file, or a PDF file.
- Select the PageRipper utility from the first selector
- Comixer will then ask you whether the Front & Back
Covers are the first page spread, the last page spread, or are not
included in the images:
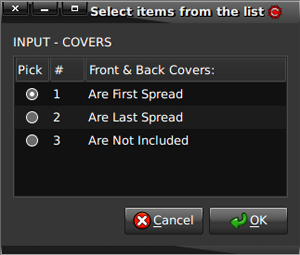
The first option will move the back cover image from the first image to the last image.
The second option moves the front cover image from the last image to the first image.
The third option leaves the files in the order in which they were created. - From that point onward the options are the same as ComixFormatter.
 ComixArchiver
Digital Comic Archives (DCA's) are a popular new format widely available on file sharing sites and peer-to-peer networks. The original idea was to create archives of out-of-print, public domain comics and keep them in circulation in digital form among collectors before they were lost forever! Some hardcore collectors have also found DCA's to be a convenient way to enjoy their existing collections and by digitizing them keep the originals in storage and mint condition while still being able to read them whenever the mood strikes. It's a lot more convenient to carry your entire comic collection on your notebook computer than all those comic storage boxes, right?
Due to the popularity of the format, and the vast existing network online, DCA's are also a great way for independent comic artists to introduce a huge audience to their work. You won't make any money doing it, since nobody has yet monetized DCA's and they have no Digital Rights Management restrictions, but that's not the point: it's to build an audience for your work! If you want to get your comics, especially out-of-print back issues or titles you're no longer producing and selling, in front of the world then the DCA format is for you.
Tell Comixer the DPI of your scanned pages
Tell Comixer the SIZE of your scanned pages
Select conversion to another comic book size (if any - you can
leave it in the original size if you like)
If you have an "info" (.nfo) file and/or a signature graphic
file point Comixer to where they are stored (it will copy them into the
archive, not move them)
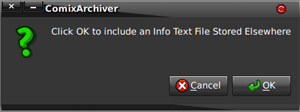
Your Info file only needs to be a plain text file.
Comixer will copy it into the archive and convert it into a ".nfo"
format file.
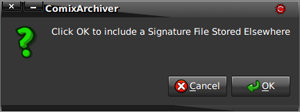
Your "Signature" or "Sig" file, if you want one, is any web format
(PNG, JPG, GIF) graphic you like to include in your archives as a
personalized identifier.
Enter information in the dialogs so Comixer can build a file name following the preferred DCA conventions:
|
1.
 |
2.
 |
|
3.
 |
4.
 |
|
5.
 |
6a.
 |
|
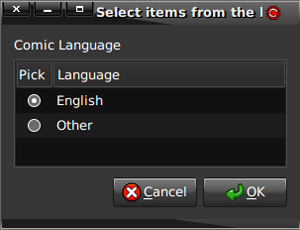
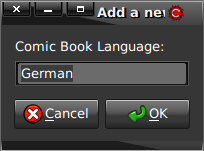
6b. If you tell Comixer your archive is in a language other than English it will ask you to enter the comic book's language before processing the archive. |
|
Wait for Comixer to process your scanned images into a DCA file ending in ".cbz"
Test your DCA file in a comic book reader program of your choice
Make it available on DCA sharing sites or P2P networks (sorry, Comixer can't help you with that part).
DCA files can be found in both .CBZ and .CBR formats. Comixer can only create .CBZ (ZIP compression) format files because CBR (RAR compression) files use a proprietary technology. Most comic book reader applications can open either format.
Disclaimer: you should only digitize books for which you have the right to do so. Using PageRipper to create DCA's or PDF's of copyrighted materials for distribution may be a violation of copyright laws and punishable by fines or imprisonment. The creator of Comixer takes no responsibility for anyone who may use this feature to pirate comic books in digital form, it is intended to provide independent comic book creators a simple means to archive and distribute their own work in DCA format.
 CoverCreator
Select "CoverCreator" from the Comixer Tasks dialog. You are then presented with two options for creating the cover:
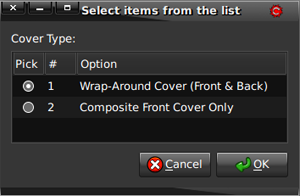
- Wrap-Around Covers:
If you are planning to send your comic book to a professional printer
or Print On Demand service you may need to provide seperate files for
your book and the cover for your book, especially if you want a
"wrap-around" cover for a perfect found book (the kind with the glued
spine and cardstock cover). Figuring out how to make one of these can
be a challenge even for a professional graphic designer, primarily
because you need to know how THICK the book will be to know how wide
the "spine" part of the cover should be! Additionally, some printers
require the publisher (which is YOU if you are independently producing
your comics) to either make space for, or actually place any bar code -
such as an EAN, ISBN, or ISSN number - on the cover at the correct size
and in the correct place. ISBN numbers typically go on the back cover,
while ISSN numbers are usually on the front cover, Comixer can
accommodate both!
The CoverCreator feature will try to help you simply and automate much of the process of creating wrap-around covers. You need to provide at least two images, one for the front cover and one for the back cover. You can also use a third image for the spine - but keep in mind it will be distorted to fit the space an in the current version of Comixer no text is superimposed on top of it. You can also, optionally, provide an image of any barcode you need to include (preferably in EPS format to ensure it is scaled without loss of resolution). - Front Cover Compositing: Whether your are making a wrap-around cover, or only the front cover, Comixer can help you dress it up! The Front Cover Compositing options are an extension of the feature that allows you to create space and/or place an ISSN barcode on your front cover, adding the ability to composite a logo graphic and (optionally) a cover "badge" indicating Issue Number, Volume Number, and Cover Price.
WRAP-AROUND COVERS
Spine Width
Calculating the spine width can be a daunting task because you need to know how thick your book will be before it is even printed. Which means you also need to know how thick the paper used to make the book will be. Comixer provides three different ways to calculate the spine width:
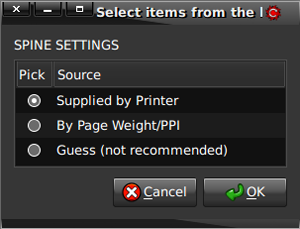
- Supplied by Printer (Preferred
method)
- Enter the width in Pixels or Inches given to you by the
printer
- Enter the width in Pixels or Inches given to you by the
printer
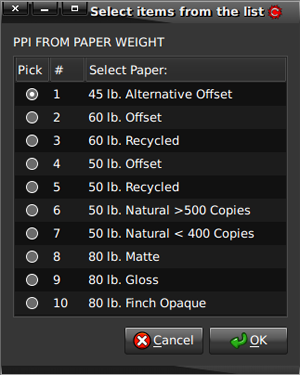
- Calculate based on Paperweight/PPI value
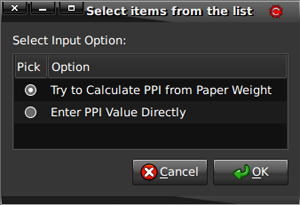
- Enter a PPI value directly (if you know it)
- Calculate based on Paperweight (select from a list of
common papers)
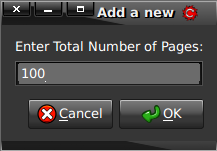
- Once you have a PPI number, enter the book's page count
- Guess (best for mock-ups, absolutely NOT recommended for
production as it's probably wrong)
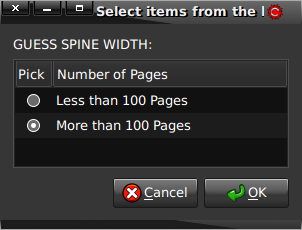
- Select either "Less than 100 pages" or "More than 100 pages" and it will use a predefined value.
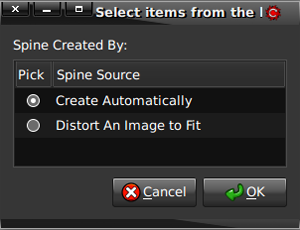
Spine Source
For the spine artwork you can either select an image file (which will be distorted to fit the available space in the spine), or Comixer can create a simple spine image from scratch!
- You will be asked whether or not you want Comixer to
distort an image file to fit the available Spine space, or if you'd
like Comixer to create a simple spine graphic from scratch:
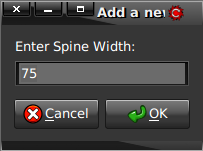
If you select "Distort and Image to Fit" the next thing Comixer asks you is if you want to point it to a file OR if you want Comixer to tell you what dimensions your spine graphic should be.
If you select "Create Cover with Existing Image" you will see a file chooser dialog where you can point Comixer to the file you would like to use. Comixer will then FORCE that image into the spine height and width without attempting to preserve the aspect ratio.
If you select "Tell Me The Spine Dimensions" an information dialog will open telling you the calculated width and height for the spine. It also informs you of the location of an automatically generated Spine Template image you can use in your graphics program (such as GIMP) to make sure you create a graphic the correct size and resolution (remember that it will include the Bleed allowance at the top and bottom of the template). Comixer will then EXIT without producing the wrap-around cover. Once you have created your custom sized spine graphic you can re-run the CoverCreator and select "Create Cover with Existing Image" and point Comixer to your custom sized graphic. Doing this will ensure the spine artwork is composited without distortion.
The Spine Template image will be however long the height of your book is. The gray areas at the ends represent the Bleed allowance. You should not place any image content in those areas unless you intend for it to be cut off when the cover is trimmed.
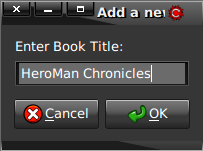
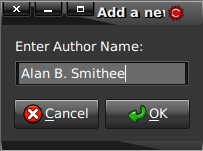
If you select "Create Automatically" Comixer will then ask you for information it needs to build the spine graphic. - Enter Book Title
- Enter Author
- You will then be asked how you would like to enter the
colors for your spine. Your options are to select colors by name from a
list, or you can enter a color "Hex" code if you know it.
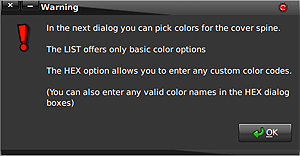
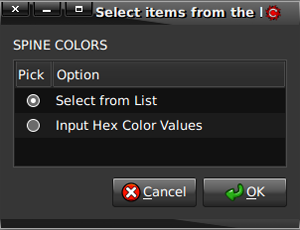
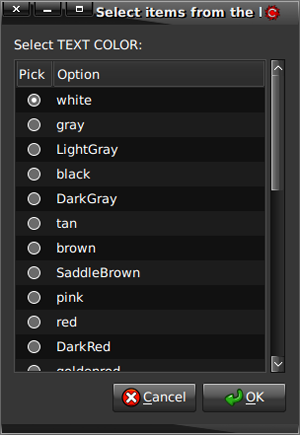
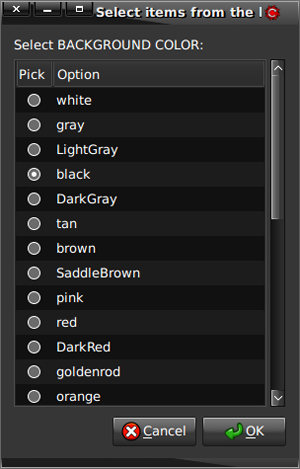
SELECT COLORS FROM LIST
- Select colors for the Text that will appear on the Spine:
- Select a background color for the spine - this should be a
contrasting color and never the same color you chose for the text:
INPUT HEX COLOR VALUES
Enter a Color Hex Code for the Text Color. You must lead with the "#" character! The Hex codes can be given in either 3 number or 6 number format.
Enter a Color Hex Code for the Background Color. Again, you must lead with the "#" character.
Be aware that covers that will be printed are eventually converted to the CMYK colorspace (even if you submit an RGB file it will be re-mapped to CMYK before printing). If you do not want the colors to shift you should take care to select color codes you know are within the CMYK gamut.
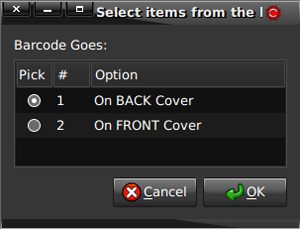
BARCODE PLACEMENT
- It is also common for printers to require cover art have an
open (white) space in which to place an ISBN/ISSN barcode. Comixer then
asks you if you want to create such a space:
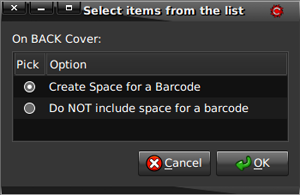
- If you selected the "Wrap-Around Cover" option you will be
asked whether the barcode space should be created on the Front Cover or
the Back Cover. Typically ISBN (Book) codes are placed on the back
cover, while ISSN (Periodical) codes are placed on the front cover. If
you are only compositing front cover artwork, though, Comixer will not
ask this.
- If you indicated Comxier should create a space for the
barcode you then have the option of actually placing a barcode image
there yourself. Some printers require you to obtain and place your own
barcode graphics on wrap-around covers, others place the code for you
via variable data printing in the space created. You'll need to find
out from your printer whether you, or they, will place any barcodes.
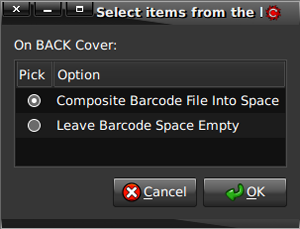
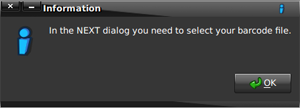
If you opt to composite a Barcode File into the space, a file browser opens so you can tell Comixer where your barcode graphic is located. It will be copied, not moved, and should be in a high quality scaleable format (EPS is recommended) for the best results.
If you do not have Barcode Fonts installed on your computer, you can use one of these free online generators to create the barcode graphic:
- http://www.barcoding.com/upc/
- http://www.terryburton.co.uk/barcodewriter/generator/
- http://www.tux.org/~milgram/bookland/
Of course you will need to know what numbers to enter into the generator to produce a valid barcode. Consult the following sites:
- Bowker ( http://www.isbn.org/standards/home/isbn/us/index.asp ) is the source in the United States for purchasing ISBN numbers.
- Periodicals (and most comic book titles are periodicals) qualify for an ISSN number. These can be obtained for FREE from different sources, depending on the country in which you are publishing. A list by nation is available at http://www.issn.org/2-22652-Requesting-an-ISSN.php. (In the United States you can contact the Library of Congress at http://www.loc.gov/issn/ ).
- It would be unusual to sell a book with something other than an ISBN code or a magazine with something other than an ISSN code, but if for some reason you consider your book a "product" rather than a "publication" you may need a different kind of code. UPC/EAN (also known as UPC-A or EAN-13) codes are the worldwide standards for product. If you are in the United States and need a UPC code contact http://barcodes.gs1us.org/dnn_bcec/Default.aspx . Outside of the United States you will probably need an EAN-13 code and should contact http://www.gs1.org/barcodes/need_a_bar_code.
Comixer doesn't know what kind of code your barcode graphic represents, it will simply scale it into the available space.
COVER COMPOSITING
"Compositing" means bringing different image elements together and overlaying one on another. This is how the Barcode placement works, but that's not all Comixer can do for your book covers!
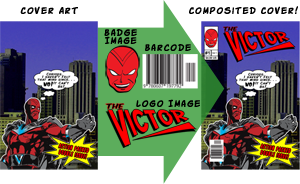
If you have a logo image you'd like to use on each edition of your book you can keep it stored as a file and have Comixer call it in and place it over your cover artwork. Additionally, Comixer can create a small "badge" on the cover showing the Issue Number, Volume Number, Cover Price, and an optional decorative image.
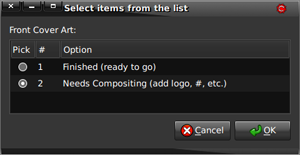
If you selected a "Wrap-Around Cover" you will be asked if the front cover is "ready to go" or needs compositing. If you chose "Composite Front Cover Only" you will not see this dialogue.
COVER BADGE
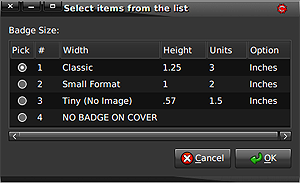
You will then be asked which size of "Badge" you'd like to place on your cover, if any. Badges would typically be added to regular issues of a comic book, but would be left off of Annuals, Compilations, or Graphic Novels. Comixer can produce the following Bage Sizes:
 |
 |
 |
| CLASSIC (1.25"x3") - this is roughly the same size as the cover badges used on classic comic books, but should only be used for the larger formats. | SMALL FORMAT (1"x2") - this fits better on the smaller format covers, while still retaining that classic look. | TINY (.57"x1.5") - This is the best format to use on Mini-Comic covers, or if you just prefer a cleaner, more modern look. |
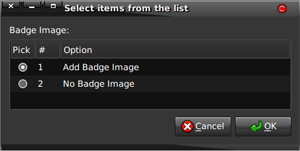
If you select "Classic" or "Small" in the previous dialog, Comixer then asks you if you have a Badge Image you'd like to add. Adding an image is completely optional! If you choose not to add an image, the Classic and Small Format styles will simply render the bottom portion of the badge with the Issue Number, Volume Number, and Cover Price - it won't even create a space for the image thus providing an alternative way to also create a "Tiny" badge with a horizontal orientation, rather than vertical.
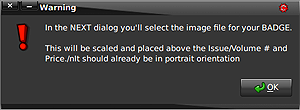
If you choose to add a badge image, the next dialog you see will warn you that you must select a file with the file browser. If you cancel file selection you will simply create a the same sort of badge as if you had chosen not to add an image in the previous dialog (in other words it won't create an empty space and it won't crash with an error).
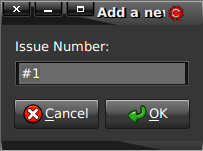

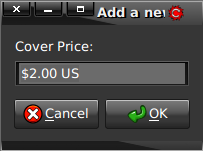
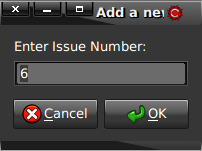
The next three dialogs gather the information to generate the Badge. Each box correlates to one of the boxes on the Badge, with the intended input for Issue Number, Volume Number, and Cover Price. However, you can type whatever information you want into the boxes. Text will be generated from what you enter and scaled to fit within the available spaces.
Hint: You can add carriage returns to the input by using \n (forward slash followed by a lower case "n") wherever you want a line break. So, instead of "Vol.1" you could have it rendered with the "Vol" above the number by typing "Vol.\n1" (without the quotes) in the box. Or you could have the word "Issue" above a two digit number by typing "Issue\n23"
Hint: You can use other types of currency in the Cover Price field! For example, in Europe you may want the price in Euros, so you could type "€ 3.00 EUR" or in England you could enter "£ 1.50 UK" or whatever your local currency - or the currency where you are selling your books - happens to be.
![]()
Next, if you want to composite a Logo Graphic onto your cover art select the first choice in the next dialog. If you've already hand-drawn your logo on your cover, or placed it with some other program, you can simply tell Comixer not to add a logo.
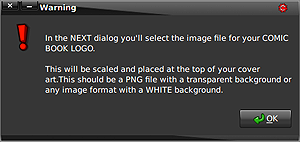
If you opted to add a logo graphic, Comixer will then warn you that you
need to select it in the next file browser dialog. This warning also
tells you that your logo image should, ideally, be a PNG file with a
transparent background. Alternatively Comixer can use virtually any
image format, so long as it has a white background - but Comixer cannot
tell if the white in your image is supposed to be there, or if you want
it to become transparent. So, in the next dialog tell Comixer which
sort of image you are providing:
![]()
If your logo graphic has any white in it, or if you are using a transparent gradient (one where the image fades out allowing varying amounts of the background to show through), you will need to use a PNG file. This file should be equal or greater than the Output Resolution and in RGB colorspace. If you have a logo graphic without any white in it, against a white background, Comixer can replace the white background with a transparency. This is particularly useful if you have a scan of a hand-drawn logo on white paper, since Comixer can automatically remove the paper and replace it with a transparency. If you selected "Has WHITE Background" you will next be asked how much of a "Fuzz Factor" Comixer should use. The higher the percentage on the "Fuzz Factor" the more pixels off from white will be made transparent. Set at "0%" only pixels which are actually pure white will be affected. At "50%" many gray tones will also be included. However you don't want to go to high or it will start making pixels transparent you probably wanted to keep.

Hint: If you are using a scanned image on white paper you should increase the contrast when you scan it (or at least before you send the image to Comixer) to ensure the background is white. The more areas that are gray the higher you'd have to set the Fuzz Factor, which might start making parts of your logo transparent that are supposed to remain opaque. Here are two examples of a (hastily) hand-drawn logo which was scanned:
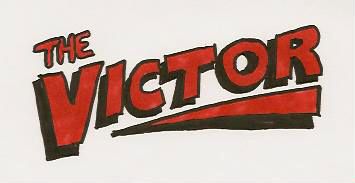
As you can probably see, the background in this image is a light gray, but what you may not be able to see so easily is the milky caste across the lettering as well. This is an example of a bad scanned image.
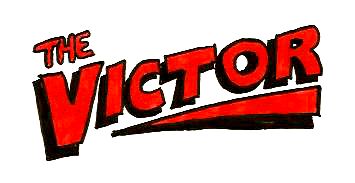
Here is the same hand-drawn logo with the contrast adjusted (this was done in the scanning software) to produce a more pure white background. Also notice that it produced much more vibrant lettering!
Hint: You can also use SVG (Scaleable Vector Graphics) images for logos. However, even if the image has a transparent background it may not be read as transparent! If you are using an SVG image with a transparent background you'll need to tell Comixer the background is white - then it will be properly composited onto your book cover.
The logo graphic will then be scaled, preserving the aspect ratio (so it's not distorted), and fit into the available space at the top of the cover. If you are not using a Badge the logo will be centered and scaled to fit within the "Live" margins. If there is also a Badge on the cover the Logo is scaled to fit to the right of the Badge. Therefore it isn't that important what the dimensions of your original Logo graphic are, but if it is too small, or at a lower resolution, or is not vector art it will render somewhat blurry.
Examples of Composited Covers using different options:
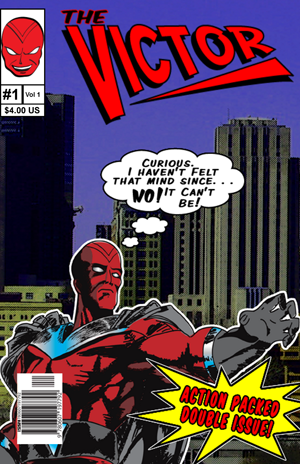
Typical comic book format cover with Badge, Logo, and ISSN Barcode placed by Comixer.
Same cover with only a Logo image placed, as you would do for a Graphic Novel.
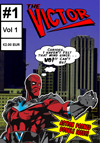
The same cover, scaled to A7 Mini-Comic size (the smallest of the mini-comic formats) with the Tiny badge and Logo images placed.
As you can see it is quite easy to re-composite the same cover art with different settings - even different images. This could be particularly useful if you release your comics in multiple languages or markets since you can easily change out Logos, barcodes, and cover information.
This feature is highly experimental. If you create a wrap-around cover with it and it is accepted or rejected by a printer please leave feedback at http://dab.ryumaru.com so future versions of Comixer can be improved for all users.
Note: the CoverCreator currently is not capable of creating a single file with both inside and outside cover art. However, you can generate two files, one for each side and use a PDF utility to combine them into a single file if that's what your printer wants.
 MiniComicMaker
Many independent comic creators start out by making mini-comics, and even once you've moved to professional printing it can be fun to put out a small-run mini-comic from time to time. One of the most confusing aspects of making them, though, if figuring out how to arrange the pages so they appear in the correct order when the comic is assembled. You can also scale pages created at other sizes to your preferred Mini-Comic format, which is great for re-releasing back issues of larger comics as mini-comics. The MiniComicMaker also features automatic insertion of blank pages if your book doesn't have the right number required by the selected format, plus it can adjust WHERE it adds them depending on whether your comic layout includes the cover or not
- Select MiniComicMaker from the first tasks dialog:
- Tell Comixer the DPI of your scanned pages
- Tell Comixer the SIZE of your scanned pages
Comixer can scale pages originally drawn at any of the 18 available sizes to any of the Mini-Comic sizes. - You will not be asked for an Output Resolution, it will automatically be set to 300 dpi, which is typical of inkjet and laser printers. You will select the Output Size in the next section.
- When you select the MiniComicMaker in the first options you
will go through are the same as the ComixFormatter dialogs until you
see this Splash Dialog:
- Automatic Pagination/Imposition for printing on A4, US
Letter, or US Tabloid size paper is available in the following formats
only:
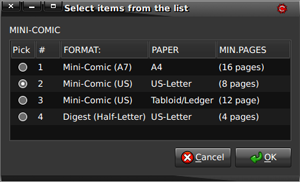
- A7 (16 pages minimum)
- US Mini-Comic (8 pages minimum on Letter sized paper)
- US Mini-Comic (12 pages minimum on Tabloid sized paper)
- US Digest/Half-Letter (4 pages minimum)
- Arrangements for both "Cut & Fold" and "Fold
& Cut" assembly methods are available (except for
Tabloid/Ledger).
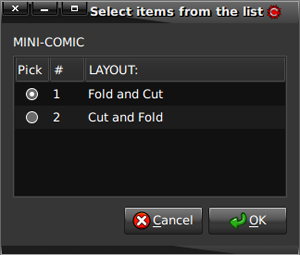
"Fold & Cut" assembly is the kind where some of the pages are printed upside down.
"Cut & Fold" assembly keeps all pages right-side up.
There is no "right or wrong" as to assembly method, it's a matter of personal preference. You may want to refer to the Comixer web site for details on each method of assembly: http://dab.ryumaru.com/comixer - You will also be asked if your page scans include the
comic book cover. Some people may prefer to print their covers on
cardstock or different paper, so Comixer does not assume Mini-Comics
always include the front and back cover:
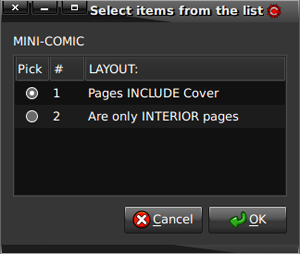
If your comic book DOES include the cover, AND does not have the requisite number of pages for the selected format this selection will also determine where Comixer inserts any blank pages. If the cover is included the last image will be moved to the last page and any inserted pages will be after the 2nd to last image and the last (Comixer assumes the last image is the back cover). However, if the comic book does NOT include the cover, any blank page will simply be inserted after the last image. - It is also common for people making Mini-Comics to consider
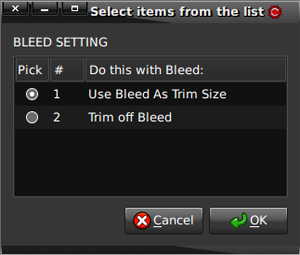
the "Trim" size of the paper the same as the "Bleed" size, since it is
pre-cut office paper. If you want to do this simply tell Comixer in the
next dialog. Otherwise Comixer can treat the "Bleed" as an actual bleed
allowance, which can be trimmed off of the final image.
- Sit back, relax, wait for your Mini-Comic PDF file!
Once your pages have been scaled (if necessary) and arranged on the sheets, Comixer produces a PDF file which can be used to print the mini-comic directly on a duplexing home printer, or to create a crisp "master" for reproduction on a duplexing photocopier.
Mini-Comic maker is also great for quickly arranging scans of sketches and other vignettes into a promotional give-away at conventions, comic shops, or hand them out to passers by on the street!
Technical Notes
Known Issues
PDF File Size Limit
Comixer uses Ghostscript to create the PDF files, which has a 2 Gigabyte file size limit (unless you are using a custom compiled version built to allow files larger than that). As a result it is possible no PDF file will be created at the end of the process! This is most likely to happen when you have a large book with large, uncompressed image files. Try compressing (or using higher compression on) the images in your PDF.CMYK Colorspace
- JPEG images output in CMYK colorspace will most likely not be viewable, or will view incorrectly, in a web browser.
- Images exported as TIFF with CMYK colorspace may appear as if they are completely transparent (however the image data IS still there, and if PDF export is selected instead the image will render with CMYK color (but only inside the PDF).
- CMYK colors in PDF files may be darker or shifted. CMYK is only capable of producing about 5000 colors, which isn't very many compared to RGB which can produce millions. When an image is converted from RGB to CMYK the computer must re-map the RGB colors to a similar color within the CMYK gamut, but it is highly unlikely the color picked won't be noticeably different from the original in some way. Comixer presently cannot use custom color profiles, so if the colorspace conversions it produces are not acceptable you should do those conversions in another program.
MiniComicMaker
Comic pages are rendered smaller than expected. Mini-Comics, in practice, often do not have a Bleed allowance. Comixer, however, does take the Bleed into account. If your comic pages are rendering smaller than expected Comixer is probably adding a Bleed margin around your artwork. Try selecting the "Use Trim as Bleed" option in the dialogs. Also note that Comixer tries to fit your artwork into the dimensions of the Mini-Comic pages while preserving the aspect ratio. If your artwork's height and width ratio are significantly different from the selected output size there will be extra space around the artwork to make it fit.Spine Text
- Text Too Small: Generally text should not be placed on the spines of books under 100 pages because it is rendered at such a small size. Comixer WILL allow you to do it, but if you'd like to avoid actually having the tiny text appear you should make the text and background colors the same.
- Changing Font: Comixer offers no options for changing the font it uses when automatically creating a spine and ASSUMES you have a "Sans" font installed. If you wish to use a more interesting or different font you'll need to alter Comixer's code at line 1672. Change "Sans" to the name of your desired font. You should keep the name enclosed in quotes, especially if the font name has any spaces in it. Comixer has no way to find out if the font named is actually installed, so make sure it is available on your system BEFORE you change it.
Installation
Comixer was designed as part of the DAB Linux distribution, but it can also be installed on other Linux distributions if you prefer. Here's how to do it:
- Make sure you have satisfied the dependencies, all of which
should be available in your distribution's repositories:
- Nautilus (you should be able to install it even if you have other file managers installed)
- ImageMagick
- Ghostscript
- Zenity
- Zip
- Download the Comixer ZIP file and extract it to your HOME
folder. This will place two new folders:
- .comixer (which contains this manual and the program icon)
- .gnome2/nautilus-scripts/Comixer (which contains the program and a launcher for the user manual)
- Navigate to the .gnome2/nautilus-scripts/Comixer folder (you may need to tell Nautilus to show hidden files)
- Right+Click on the Comixer folder, go to Permissions, select "Allow Executing as a Program," and the "Apply to Enclosed Files" checkbox.
- You will need to use Nautilus to navigate to your folder of scans and to select the files, then right+click and select Scripts->Comixer->Comixer
In theory you should also be able to install it on BSD and possibly Mac OSX, so long as the dependencies are met, but this has not yet been tested.
Confusing Comixer
Here is the explanation for why you can't use just zeroes to name the first file. Comixer counts like we do - from the number ONE. Here's what it does:
- Creates a list of the selected files in Nautilus
- Orders the list by file name
- Creates an output folder
- Copies each file into the output folder and converts it to the output file format
- performs various operations on the copy of the file
- standardizes the file name to just an incremented number (so it can more easily be accessed by any additional processes)
If you name the first file in your folder "00.png" it is initially copied and converted to "00.tiff" (because Comixer initially keeps your original file name, it just changes the file type), that last step starts counting from ONE, so it turns "00.tiff" into "01.tiff." When Comixer goes back to your source files, the next one is probably named "01.png" so when it gets copied and converted into the output folder it overwrites the "01.tiff" that's already there - and you LOSE your first image from the process. If the file is named ANYTHING other than with just zeroes there are no problems.
For example, if the first file is named "HeroMan-00.png" it becomes "HeroMan-00.tiff" until the last step where it is converted to "01.tiff." The the next image, named "HeroMan-01.png" is copied and converted to "HeroMan-01.tiff" and ultimately to "02.tiff" - so even if you used zeroes (but not exclusively zeroes) in the first file name it won't cause overwrite errors.
Enabling LZW Compression
LZW is a lossless compression method which is not included by default because it is a proprietary technology and support has been removed from some versions of ImageMagick, which is the back-end processor used by Comixer. If you have a version of ImageMagick with the licensed LZW compression you can edit the Comxier shell script to enable it by changing the Global Variable (near the top of the code at line 68). Change:
EnableLZW=0 to EnableLZW=1
The next time you run Comixer you will be presented with LZW as a compression method option. Please note it will only actually work if you have LZW support installed!
PDF Viewing Options
Comixer was designed to work with programs installed by default with dab, which includes the Evince PDF document viewer. Upon creation of a PDF file it opens it in Evince for inspection. If you would prefer Comixer NOT open the file look in the Comixer shell script under the Global Variables at line 65 (near the top of the code) and change:
OpenPDF=1 to OpenPDF=0
If you would still like to review the PDF files, but prefer some other PDF viewer for that task, again look in the Global Variables section at line 66 of the code and change:
PDFviewer="evince" <-change the program name in quotes to whatever command you'd type in a terminal window to launch your preferred PDF application.
That's it! See how easy it is to make Comixer do your bidding?
License
This
program is free software: you can redistribute it and/or modify it
under the terms of the GNU General Public License as published by the
Free Software Foundation, either version 3 of the License,
or (at
your option) any later version.
This program is distributed in
the hope that it will be useful, but WITHOUT ANY WARRANTY; without even
the implied warranty of MERCHANTABILITY or FITNESS FOR A PARTICULAR
PURPOSE. See the GNU General Public License for more details.
You should have received a copy of the GNU General Public License along
with this program. If not, see http://www.gnu.org/licenses/.
Please Note: Any media (image files, books, PDFs, or DCA files) produced with Comixer are NOT subject to the terms of the GNU General Public License, they are not considered derivative works of Comixer, they are simply being processed by Comixer!
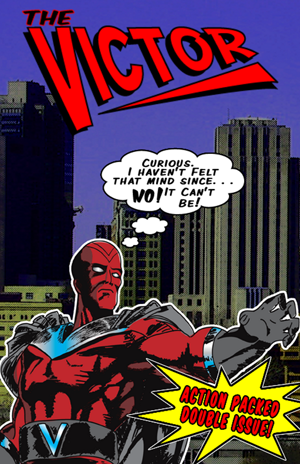
Sample artwork featuring "The Victor," icons, and Comixer logo designed by and Copyright 2009 Kristiana Hansen. Permission is granted only to redistribute them or use them in conjunction with promotion of, or tutorials regarding, the Comixer program.