The “Pages” tab of the “Options” section allows you to do global configuration of how pages behave in all your Ryuzine Press Editions.
Pages Set-Up
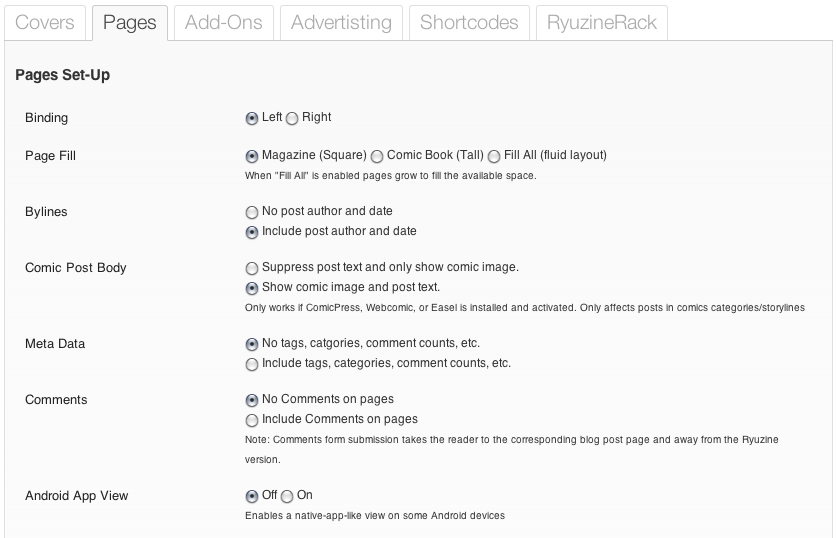
Binding
The Ryuzine webapp is designed to support virtualization of right or left bound books. In particular right-hand binding was added to accommodate a realistic simulation of Japanese Manga style comics.
Page Fill
This option controls the size of the virtual Ryuzine magazine pages.
Magazine (Square) – is more like a traditional magazine in shape. If you’re publishing a newsletter or magazine style Ryuzine use this setting.
Comic Book (Tall) – if you are publishing a webcomic consisting of pages drawn in a typical, traditional comic book format this option will best fit your artwork and provide a more “authentic” comic book reading experience.
Fill All (fluid layout) – causes the pages to literally fill ALL the available space in the browser window. This should only be used for “fluid” layouts (i.e., those that use percentages instead of set widths and heights).
Bylines
Normally WordPress posts who the screen name of a post’s author and the date it was published. If you’re doing more of a magazine-style publication it makes sense to include these, but if you’re publishing a webcomic where all the posts are by the same author and the publication date isn’t really important you can suppress display of the author and date.
Comic Post Body
If you are using the ComicPress, Webcomic, or Comic Easel plugin on your blog this option allows you to selectively show or hide any post text associated with a comic post. If you want your Ryuzine Press Edition web comic to be more like a real comic you’ll probably want to suppress the text and just show the comic on each page.
Meta Data
Regular WordPress blog posts are usually accompanied by “meta data” such as the category or categories to which the post belongs, tags, comment counts, etc. Some of which are links to blog post archive pages, but those links within a Ryuzine publication page will take your readers away from the magazine version and to the blog. If you don’t want that to happen you can simply suppress display of all this meta data.
Comments
If the reader feedback to an article is important you can opt to show those comments right in the Ryuzine Press Edition pages. You’ll also see a comment box, but (like the Meta Data links) submission will take your readers away from the Ryuzine edition and to the corresponding post on your blog. For a cleaner, more magazine-like appearance and to prevent users inadvertently leaving the magazine format you can turn commenting off.
Page Slider
Ryuzine Reader normally uses a “Table of Contents” panel showing the titles of all the blog posts you included in the Edition. If your content is something that doesn’t really need page titles (for example, a webcomic) the “Page Slider” navigation may be more appropriate. Simply select which kind of navigation you would like to be set as the default (your readers can set their own preference in the Options Panel too).
Animate View Changes
Normally when a reader changes the View the webapps animate the current view sliding out and the new view sliding in. When this is disabled the view “snaps” from one change to another (readers can set their own preference for this in the Options Panel too).
Zoom & Pan
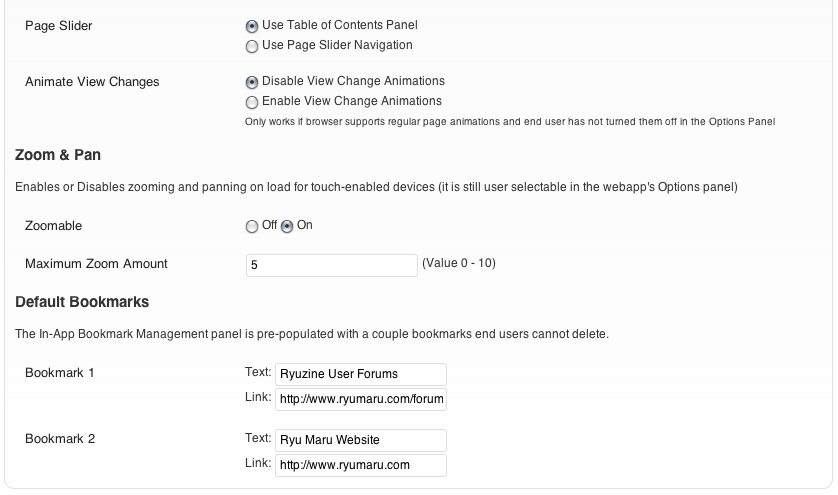
Touch-enabled devices typically allow users to zoom in and out on web content and pan/drag the content while zoomed. Mobile apps, however, often are not zoomable. The Ryuzine webapp can do both and this option determines whether your magazines will have zooming enabled by default (like any other web page) or if they will have it disabled (like most mobile apps). You can also set the maximum zoom factor between 0 – 10 (zero effectively disables zooming even if the feature is enabled, 5 is the default, 10 is the maximum). End users, however, can selectively enable and disable this feature in the webapp’s “Options” panel, so this is just the initial setting the first time someone opens the magazine.
Default Bookmarks
The Ryuzine webapp includes an in-app multi-bookmarking and a Bookmark Management Panel to add, delete, and access those bookmarks. There are also two “default” bookmarks which end users cannot delete that are configurable by publishers. Normally they point to the Ryuzine User Forums and Ryu Maru Website, but you can change them to point to your own resources instead.