Ryuzine Copyright 2011,2012 K.M. Hansen & Ryu Maru - All Rights Reserved
Ryuzine Copyright 2011,2012 K.M. Hansen & Ryu Maru - All Rights Reserved
![]()
0.9.6.x Beta
ADD-ONS
developer manual
Copyright 2011-2013 K.M. Hansen & Ryu Maru.
All rights reserved. Reproduction and adaptation of this manual is prohibited without prior written permission, except as allowed under copyright laws. Automatic translation through online methods or devices is allowed. The programs that control this product are copyrighted.
Version 0.9.6.x (Beta) Released February 2013 This manual was created in Ryuzine format with Ryuzine Writer.
Notice of Liability
The information in this manual is distributed on an "As Is" basis, without any warranty, and subject to change without notice. Neither the author nor publisher shall have any liability to any person or entity with respect to any loss or dmange caused or alleged to be caused directly or indirectly by the instruction contained in this manual or by the computer software products described in it. Please be aware as you use this software that it is still considered to be BETA SOFTWARE and therefore may function in unexpected ways. Obviously we try our best to make sure it is as stable as possible and try to address problems as quickly as possible when they come up, but there are still some bugs (webOS and Opera are currently the least stable). In the event that you do experience any undocumented problems with this software, we would like to hear about it and will do our best to fix the problem in a future release. You can let us know about bugs by commenting in the forums at www.ryumaru.com.
Trademarks
Internet Explorer® is a registered trademark of Microsoft® Corporation. iOS®, iPhone®, iPod®, iPad®, and Safari® are registered trademarks of Apple Inc. Firefox® is a registered trademark of Mozilla Corporation. Opera™ is a trademark of Opera Software ASA. InDesign® is a registered trademark of Adobe Systems Inc. Scribus Copyright 2001-2011 Franz Schmid and rest of the members of the Scribus Team. Ryuzine™ is a trademark of Ryu Maru.
Ryuzine Writer Add-Ons Developer Manual First Edition (February 2013)
|
|
|
Ryuzine Writer Version 0.9.6.x Beta K.M. Hansen |
|
|
![]()
Ryuzine™ is a family of webapps built on HTML5, CSS3, and Javascript designed to deliver a rich "app experience" publishing platform to mobile and desktop browser. Because they run inside the web browser there is no native app to download and install, no app store needed, no DRM, and the "responsive" interface adapts to different screen sizes allowing you to publish once for multiple platforms. The Ryuzine family of webapps includes:
![]() Ryuzine Reader - the publication format that doesn't require a separate e-reader app because the browser you already use is the e-reader. It offers numerous features including multiple bookmarks, font size adjustment, high-contrast and sepia page color options, integrated "mobile style" advertising1 options, alternate views, and highly customizable User Interface through a simple "theme" file plus targeting different platforms with different themes. Ryuzine publications can be hosted "in the cloud" on any website, packaged into archives for distribution as downloads for offline reading, or packaged as a native Android app2.
Ryuzine Reader - the publication format that doesn't require a separate e-reader app because the browser you already use is the e-reader. It offers numerous features including multiple bookmarks, font size adjustment, high-contrast and sepia page color options, integrated "mobile style" advertising1 options, alternate views, and highly customizable User Interface through a simple "theme" file plus targeting different platforms with different themes. Ryuzine publications can be hosted "in the cloud" on any website, packaged into archives for distribution as downloads for offline reading, or packaged as a native Android app2.
![]() Ryuzine Rack - a "newsstand" style webapp designed to make it easy to promote your Ryuzine publications (or anything else you want to promote). The stand-alone version uses simple HTML files for the "catalogs" of items, can host unlimited additional catalogs organized however the publisher wants (different titles, years, languages - it's up to you!), user defined "Reading List" feature, items which can be sorted by multiple aspects, and an animated "promotion" carousel. Building the data catalogs for the "stand alone" version is really easy with Ryuzine Writer and the Ryuzine Press Plugin (see below) also has a utility for WordPress-powered catalogs.
Ryuzine Rack - a "newsstand" style webapp designed to make it easy to promote your Ryuzine publications (or anything else you want to promote). The stand-alone version uses simple HTML files for the "catalogs" of items, can host unlimited additional catalogs organized however the publisher wants (different titles, years, languages - it's up to you!), user defined "Reading List" feature, items which can be sorted by multiple aspects, and an animated "promotion" carousel. Building the data catalogs for the "stand alone" version is really easy with Ryuzine Writer and the Ryuzine Press Plugin (see below) also has a utility for WordPress-powered catalogs.
![]() Ryuzine Writer - a powerful cross-platform, cross-browser "authoring" webapp for creating Ryuzine publications, custom configuration files, and Ryuzine Rack data catalogs. Compose from scratch in the rich-text editor, start with the Template Wizard, or import and edit existing files. There is also a multi-device "simulator" in which you can see how your publication will look and work across a variety of screen sizes. Ryuzine Writer works on the latest versions of Safari, Chrome, Firefox, and Internet Explorer and has experimental support for use on mobile devices like the iPad, iPhone, and Android phones and tablets.
Ryuzine Writer - a powerful cross-platform, cross-browser "authoring" webapp for creating Ryuzine publications, custom configuration files, and Ryuzine Rack data catalogs. Compose from scratch in the rich-text editor, start with the Template Wizard, or import and edit existing files. There is also a multi-device "simulator" in which you can see how your publication will look and work across a variety of screen sizes. Ryuzine Writer works on the latest versions of Safari, Chrome, Firefox, and Internet Explorer and has experimental support for use on mobile devices like the iPad, iPhone, and Android phones and tablets.
![]() Ryuzine Press - a plugin for WordPress blog sites which "bridges" the blog content to a Ryuzine installation on the same server. Create unlimited "editions" from your blog content, automatically packaged neatly into the engaging Ryuzine format. Promote your editions - and other items - with the (optional) bundled version of Ryuzine Rack. The Ryuzine Press Plugin replaces Ryuzine Writer with the WordPress backend for creating, editing, and organizing your content. It is also compatible with the ComicPress, Easel, and Webcomic plugins for building dynamic online comic books and manga from your existing WordPress-powered webcomic archives.
Ryuzine Press - a plugin for WordPress blog sites which "bridges" the blog content to a Ryuzine installation on the same server. Create unlimited "editions" from your blog content, automatically packaged neatly into the engaging Ryuzine format. Promote your editions - and other items - with the (optional) bundled version of Ryuzine Rack. The Ryuzine Press Plugin replaces Ryuzine Writer with the WordPress backend for creating, editing, and organizing your content. It is also compatible with the ComicPress, Easel, and Webcomic plugins for building dynamic online comic books and manga from your existing WordPress-powered webcomic archives.
This manual covers the Ryuzine Writer authoring webapp for publishers creating "stand alone" publications and newsstands. It assumes you are at least familiar with Cascading Style Sheets (CSS), HTML web pages, and document editing. It is also helpful if you understand file and folder structures, web servers, and editing images. This manual is not intended for end users of Ryuzine Reader, who may refer to the "help" content available under the [?] button within the Reader webapp.
Note: Most of the screen shots throughout this manual are of Ryuzine Writer running in either Google Chrome or Apple's Safari on a Macintosh system. Because of the "OS Integration" themes the webapp's appearance will be different on other platforms but the general positioning of elements is the same, exept on Android devices where the top and bottom toolbar positions are swapped.
1 Revenue-generating advertising requires the purchase of our incredibly affordable Commercial Use License 2 Requires either the Android SDK or AppMobi Chrome Extension. A detailed tutorial on both methods is posted in the forums.
Add-ons, as the name implies, are optional extensions to the Ryuzine webapps. This version of Ryuzine Writer introduces a new, completely re-written add-on system designed to make it easier for third parties to develop add-ons.
The "writer.config.js" file has a new section near the end that looks like this:
var AddOns = [ // 'sample', 'iscroll', 'localization', 'rounded_corners', 'ovr', 'addTouch' ]
The items in quotes correspond to folder names in ~/ryuzinewriter/addons/ and those, in turn, may also include installers to ~/addons/ for Reader and Rack. The order of the items is typically the order in which they are loaded, however if an earlier add-on is much longer a script than a later item it is entirely possible the later item will have finished loading before the earlier one. Also note that the last item never has a comma after it!
The Add-Ons are loaded at the END of the initialization process, so the DOM should be ready if your add-on needs to manipulate it directly. All Writer Add-Ons are automatically added to the RZW.addon object to avoid possible namespace collisions with vital app objects.
Ryuzine Reader / Rack have their own add-ons folder separate from the one for Ryuzine Writer. So the main two types of add-ons would be "Reader" and "Writer" add-ons.
Writer add-ons are always javascripts. They might "inject" code into Ryuzine publications being built in the editor, or they may alter or extend Ryuzine Writer itself. So, among Writer Add-ons there are two sub-types: "Injectors" and "Non-Injectors" The "injector" variety usually also create a selector input on the "Output Options" panel and a corresponding selector on the "Build Package --> Custom Package" panel. Writer Add-Ons may also include within their package a folder containing the Reader add-on, which Writer Add-Ons can optionally install to the Reader addons folder (if PHP File Operations are available).
Reader Add-Ons may be either javascript or css files, so the two sub-types of Reader Add-on are "scripts" and "styles."
The Ryuzine PDK and Ryuzine Press install include all the add-ons available from Ryu Maru.
Meet The Add-Ons!
addTouch - an injector for Anders Tornblad's multi-touch simulation for desktop systems. This one is "experimental" and has some issues and may no longer be in development, but the source code is available at github. While it does get injected into the Ryuzine Reader publication there is no corresponding Reader Add-On as this is only intended for use within the Ryuzine Writer Simulator.
iscroll - an injector for Matias Duerte's excellent "momentum scrolling" script. There is a corresponding Reader Add-On containing the actual script.
localization - an injector for the corresponding Reader add-on that changes the publication UI to another language. There is a corresponding Reader Add-On that does the actual changes to the UI.
ovr - an injector for the OVR (Object Virtual Reality) player script. There is a corresponding Reader Add-On with the actual scripts and stylehseets required by the player.
rounded_corners - an injector for the optional styling of two-page spreads that subtly curve inward toward the spine for a more realistic "open book" appearance. The actual stylesheet resides in a corresponding Reader Add-On.
sample & sample2 - The "sample" add-on is a demonstration of the various things a Writer Add-On can do, including "chain loading" the "sample2" add-on and auto-installing a "sample" add-on to Reader. You'll notice that it is commented out in the "writer.config.js" file.
Third-party add-ons may become available in the User Support Forums, and if you develop any add-ons you'd like to share with other users that would be the place to post a link.
Take a look at the "sample" add-on to see the format. At the top is a line that reads:
var addon = RZW.addon['sample'];
All you need to do is put the name of your add-on (the same name you declared in the AddOns array) and the file needs to be saved with the name format:
youraddon.config.js
After you've set the name all your objects can be declared with the variable "addon" (this should make it easier to build out addons without having to retype the name of your add-on again and again).
Any objects of variables within your add-on you have chosen to publicly expose are accessible by either of the following patterns:
RZW.addon['youraddon'].yourobject; RZW.addon.youraddon.yourobject;
Before you create a publicly exposed extension to the Add-On object, though, refer to the "Reserved Objects" so you don't create a conflict.
The "index" value is the array index order in which the add-on was loaded. It can be useful for debugging purposes if you are having some kind of conflict with another add-on. Keep in mind that the loading order is not necessarily going to render the same index each time, so if you need to reference it for some reason always make sure to grab the current value before you do anything with it.
The "name" value simply passes the name of your add-on object INTO the object itself (since javascript provides no way for child objects to query the NAME of the parent object to which they belong).
You can access these objects by either of the following patterns:
RZW.addon['youraddon'].index; RZW.addon['youraddon'].name;
or
RZW.addon.youraddon.index; RZW.addon.youraddon.name;
The other "Reserved Objects" are:
You can also access configuration variables through the "cfg" object (do not preface it with "RZW" or try to access it directly from the config file). For example if you wanted to check that PHP File operations are available before you do something you would use:
if (cfg.xfileman==1) { ...do file stuff ...} else { ...do other stuff... }
Any add-on you create may be released under any license you want and are not subject to the terms nor conditions of the Ryuzine webapp license agreement.
If your add-on uses code from another project it must comply with the terms of that project's license, but that's up to you. Ryu Maru has no review nor approval process for add-ons. Whatever license applies to an add-on has no bearing on the Ryuzine webapp license or code use and is considered a distinct, and separate program.
Any Add-Ons you create and want to share can have a download link for them posted in the Ryu Maru forums. As there is no review process any Add-Ons from third parties are offered by the creator/distributor of that add-on and Ryu Maru makes no claims to it nor will we provide any support for third-party add-ons. Download and use of any add-on is at your own risk and Ryu Maru assumes no liability for any consequences of using such an add-on. Ryu Maru also reserves the right to change the terms of our license and/or the core application code at any time and without notice. Code updates to the Ryuzine webapps may periodically "break" the functionality of some third-party add-ons. If that happens it is the original add-on developer's responsibility to update it.
The original purpose of the Add-On system was to "inject" a string of code (primarily a stylesheet or script call) into the <head> tag of the Ryuzine Reader publication being built with Ryuzine Writer.
First of all you have to indicate that your add-on is of the Ryuzine Reader injector variety:
addon.type = 1;
1 or "js" are valid for a script injector. 2 or "css" are valid for an external stylesheet injector 3 or "both" are valid if you need to inject multiple scripts and/or stylesheets 0 or any other value means it is not an Reader injector
What these values do is help Ryuzine Writer figure out WHERE in the <head> tag to inject the string. Generally speaking Ryuzine Reader publications define all the webapp stylehsheets first and then all the javascripts. However it is sometimes necessary to have greater control over where a script or stylesheet is placed, for example if the script uses a variable or object that needs to already have been declared or the stylesheet is intended to over-ride previously established classes. That is where the "pos" variable of the injector comes into play. This is eventually passed into a position object for the add-on:
addon.pos = 1;
0 or any non-valid value injects the string in the default position (depending on type) 1 or "first" will inject the string before the main block of either stylesheets or scripts (depending on type) 2 or "last" will inject the string after the main block of either stylesheets or scripts (depending on type)
You can also inject your string before or after another specifically named add-on. The required other add-on must be named in the "req" variable, then set "pos" to either:
3 or "before" or "<" to inject BEFORE the named add-on. 4 or "after" or ">" to inject AFTER the named add-on.
If the add-on named in the "req" variable was not also loaded (in the AddOns array of the "machine.config.js" file) you will be informed by an alert box that the dependency was not met. Your add-on's selector checkbox (if it has one) will still show up in the "Output Options" and in the "Build Package --> Custom --> Add-ons" panels, but to prevent errors the add-on's "inj" string will NOT be injected into the publication's <head> tag unless and until the dependency is met (i.e., the missing add-on is loaded).
There are also two text inputs on the "Output Options" for including a custom stylesheet and/or a custom javascript without using an add-on at all. If you set a path in the Custom Stylesheet it is injected right after the issue-specific stylesheet. The Custom Javascript option has three possible positions:
"First" - injects before any Add-On injected scripts (even if they're set to "first") "Last" - injects after any Add-On injected scripts (even if they're set to "last") and right before </head> tag. "End of Page" - injects at the end of the document, right before the </body> tag.
When figuring out where your add-on should inject the code it might be useful to know where these areas reside in the <head> tag. So here is the order of things:
- Webapp <meta> and icon styles
- Output Options --> Custom Script --> First
- Add-on type "js" and position "first"
- Add-on type "both" and position "first"
- Add-on type "css" and position "first"
- Webapp required stylesheets
- In-Page <style> content
- Output Options --> Custom Stylesheet
- Add-on type "css" and position 0 / none
- Add-on type "both" and position 0/none
- Webapp Configuration File
- Add-on type "js" and position 0/none
- Webapp core script
- Add-on type "js" and position "last"
- Add-on type " both" and position "last"
- Add-on type "css" and position "last"
- Output Optons --> Custom Script --> Last
Technically you do not need to use the "addon.injector" sub-function to set and return the injection parameters. You can declare the injector object values directly as well, however if you do not include "addon.activate();" at the end of your add-on configuration the values would not be normalized, so you'd need to make certain you'd already declared them as normalized values. By "normalized" it means they are set to simple numerical values (not text strings, including numerical values in quotes). Or save yourself potential headaches and just do it as shown in the "sample" add-on with an injector function and activation.
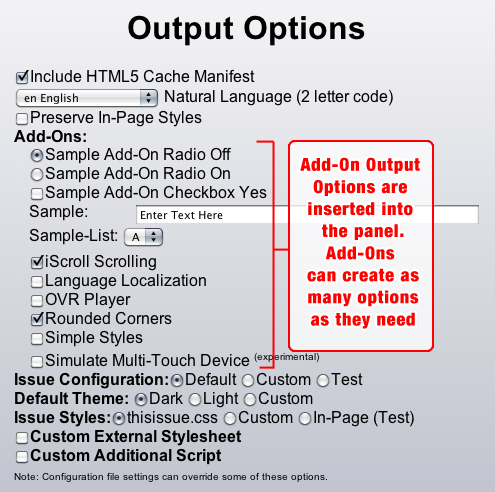
var opt = [ [type,id,label,event,action,value,state,name], [type,id,label,event,action,value,state,name] // <-- last one has no comma after it! ];
"type" can be radio, checkbox, text, list "id" is a unique identifier for your input "label" is the text next to your input "event" is the event listener for the input ( onchange, onfocus, etc.) "action" is the function the event triggers (sent as a string) "value" (optional) is the selected/checked value to pass for the input "state" (optional) sets the initial state of the item (checked = selected) "name" (optional) the form name of the input if different from ID, otherwise ID is repeated for this. If the input is a radio button ganged to other buttons they all must share the same name.
If you set the "type" to "list" you are creating a drop-down style list box. For those the "value" is an array of value-label pairs like so:
[ ['a','A'], ['b','B'], ['c','C'], ['f','F'] ],
These get written into the panel like this:
<option value='a'>A</option> <option value='b'>B</option> <option value='c'>C</option> <option value='f'>F</option>
The "state" parameter is ignored for lists. If you need to pre-select one of the options you'll need to do it programmatically by the selector's index in your add-on's "actions" section (this ensures it doesn't try to set it before the list exists, though if it is a really long list you may need to put a timeout on it to delay it even further).
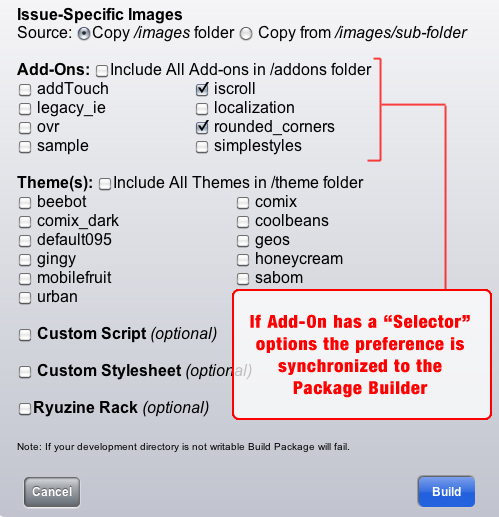
IMPORTANT: If your Writer Add-On has a corresponding Reader Add-On (most likely the file which is injected by your add-on into the <head> of the publication) AND you want a selection option on the Output Options panel to either include or exclude it, then you MUST set a "checkbox" input with an ID value that is the same as your add-on's name. It doesn't matter where in the "opt" array you declare it.
PACKAGING: Even if there is no Output Option selector the list of Add-ons on the Package Builder Panel "Custom Package" option is generated from whatever folders it finds in the READER (not Writer) /addons folder. So you can still include/exclude the Reader add-on. However, if there is a checkbox on the Output Options panel it will automatically synchronize your add-on selections on that panel with the ones on the Package Builder > Custom Package section. It re-sync's every time you open the Package Builder panel:
Technically anything in your add-on can directly manipulate the Ryuzine Writer DOM since it will have completely loaded before the add-on has, but there are some predefined functions to make it easier to create buttons, inputs, and dialog boxes associated with your add-on:
Syntax: RZW.addStartButton(id,label,action,myclass,mystyle);
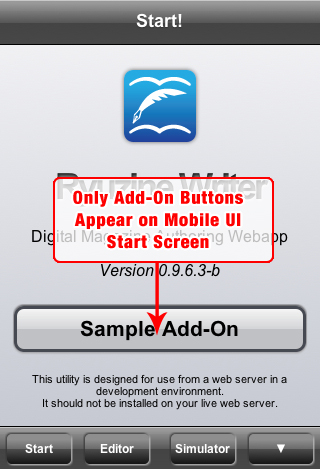
The last two parameters are optional classes and/or styles to apply to the button in addition to the ones that are applied automatically. Add-On Star Buttons are actually the only buttons shown in the Mobile UI:
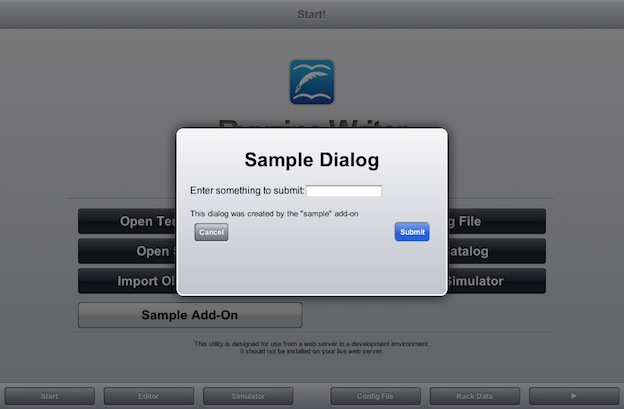
Syntax: RZW.addDialogBox(id,title,contents,action);
The "contents" are expected to be HTML code passed as a string. The "action" can be any valid function call (this is in addition to the automatically included function to close the dialog box on "Submit"). If the function they perform is a custom operation, simply define it as an object extension of your Add-On.
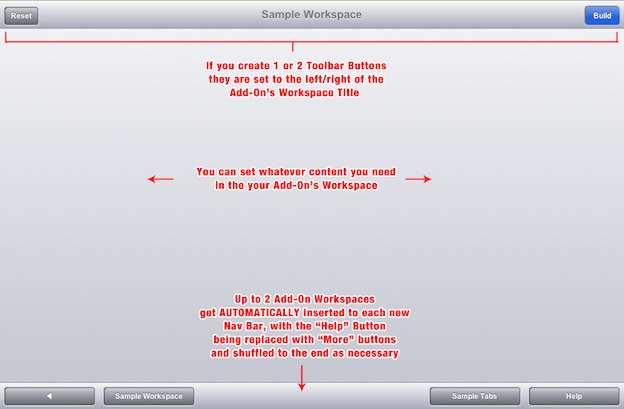
Syntax: RZW.addWorkSpace(id,title,contents,opt,label);
"id" is the object identifier for your workspace (it gets prefixed with "addon_ws_") "title" is the name in the title bar (if there will be one). If you omit "label" it is also used on the nav button. "contents" is an array of the HTML code to write into the workspace. "opt" (optional) is an array of buttons for the toolbar on your workspace. "label" (optional) is the text for the nav button (if omitted "title" text will be used).
Setting Workspace Contents
If you only include one object in the array it will be a standard workspace:
var workspace_html = '<p>test workspace code</p>'; RZW.addWorkSpace('test','Test',[workspace_html]);
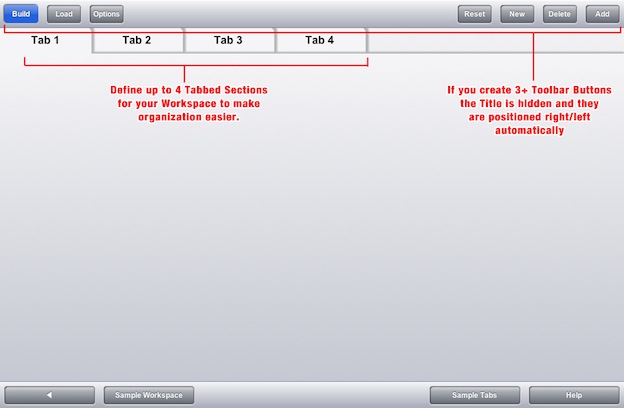
If you want a workspace with tabbed sub-sections use a multi-dimensional array with pairs:
var mytab1 = '<p>This is my first section content</p>'; var mytab2 = '<p>This is my second section content</p>'; var mytab3 = '<p>This is my third section content</p>'; RZW.addWorkSpace('test','Test',[ ['Tab 1',mytab1],['Tab 2',mytab2],['Tab 3',mytab3] ]
Note: You are limited to a maximum of FOUR tabbed sections per workspace.
Creating Workspace Toolbar Buttons
If you include the "opt" array it sets the buttons that appear in the top toolbar of the webapp. The syntax is:
[ [id,label,action,class] ]
"id" is the object identifier for the button (gets prefixed "b_") "label" is the text on the button. "action" is a function triggered by the button, given in quotes not the raw function. "class" (optional) is a custom class to apply to the button
There are some predefined custom classes: 'add-button', 'build-button', 'delete-button','load-button','new-button',options-button','reset-button' and you can also set 'type2' if, for themes that support it, you want the alternative colored button.
If you define only one or two buttons they will appear to the left/right of the workspace title in the top bar. However, if you define three or more buttons the Title text is removed to make room for the buttons. In the "Mobile UI" multiple sub-toolbars are created if you create more than four buttons (in mobile view each toolbar can only hold a maximum of four buttons):
Press the ▼ button to see next set of tools
Press the ▼ button again to see more tools or Press the ▲ button to go to previous tools
Press the ▲ button to go to previous tools (more Tool Bars are added until all buttons are shown)
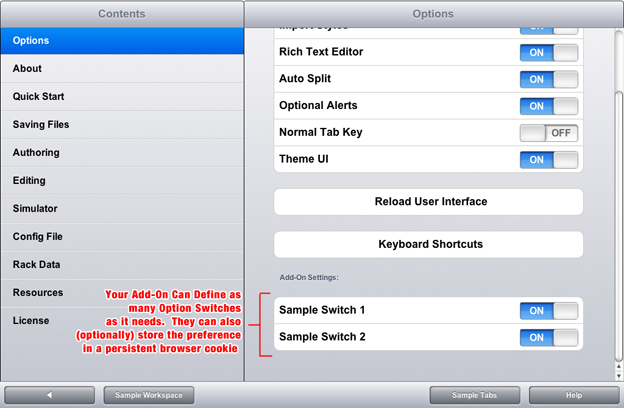
Syntax: RZW.addOptionSwitch([id,label,action,state,cookie]);
"id" it is strongly recommended your switch IDs start with the name of your add-on: "youraddon_switch1" "action" is an anonymous function the switch activates. Ex: function(){RZW.addon.youraddon.yourFunction()} "state" (optional) sets the initial toggle state of the switch: 0 = Off | 1 = On (default is "On" if omitted). "cookie" (optional) stores the state using a cookie file (if cookies are enabled): 0 - or omit - = No | 1 = Yes. If "cookie" is enabled it will be in the format of "id_set" if you need to reference it.
Syntax: RZW.loadAddOns('name1','name2');
You can load other add-ons from within your add-on, keeping in mind they each must be a separate package. If you declare an add-on package that does not exist it won't crash Ryuzine Writer, but it will show a 404 Not Found error in the console and any other add-ons dependent on the missing add-on will load but may not function as they should (however you will be informed in an alert box if a dependency is missing).
The Ryuzine PDK includes a "sample" Add-On package (and a "sample2" package). If you uncomment "sample" in the "machine.config.js" file this sample add-on will load and it will do every one of the above functions to show you how they work. If you look at the ~/ryuzinewriter/addons/sample/sample.config.js file it is heavily commented with instructions on how to build your own add-ons.
All add-ons load after the DOM has loaded as part of the Ryuzine Writer initialization function. All the code for your add-on should be placed inside of the RZW.addon.config function.
Self-Executing Activation: If you've set this function to be self-executing (with two parenthesis at the end) anything inside of it that is not itself a sub-function will automatically execute as soon as the add-on has loaded.
Delayed Activation: the primary purpose of the activate() function is to process:
If you are not using those processes then including "addon.activate();" at the end of your add-on's configuration is optional.
Ryuzine Writer Add-Ons are installed to the ~/ryuzinewriter/addons/ folder.
If your Add-On package also includes an add-on for Ryuzine Reader it should be a sub-folder inside the Writer Add-On package with the same name.
~/ryuzinewriter/addons/
|--> youraddon/
|--> youraddon.config.js (Ryuzine Writer Add-On) |--> youraddon/ (optional Reader Add-On sub-directory)
|--> youraddon.js (Ryuzine Reader Add-On)
If the PHP File Operations are enabled for Ryuzine Writer you can also set up your Writer Add-On to automatically install the Reader Add-On with the following:
addon.install = 1;
On Add-On activation it will trigger a scan of the READER /addons directory. If it doesn't find a folder with the same name as your add-on it will copy the sub-directory (if there is one) from
~/ryuzinewriter/addons/youraddon/ --> ~/addons/
If PHP File operations are not available, however, you'll need to manually move/copy the sub-directory to the Reader /addons in your development environment.
If your custom add-on is an "injector" it should have a checkbox on the "Output Options" panel to selectively include or exclude it.
That selection is synchronized with the "Build Package" panel "Custom Package" sub-section. If selected the READER (not the Writer) add-on folder will be copied into the package.
If your custom add-on is not of the injector variety, or is set up to always inject (no selector on the "Output Options" panel) you will need to us:
Build Package --> Custom --> All Add-Ons
This recursively copies EVERYTHING in the Reader "/addons" folder into the package.
Distributed by Ryu Maru
www.ryumaru.com
Copyright 2013

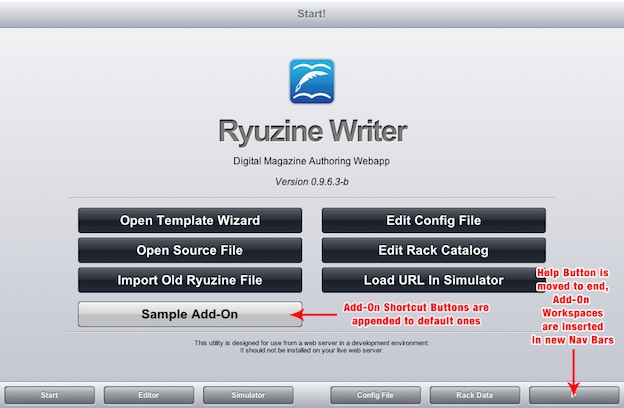
Adding shortcuts to the Start Screen

Create A New Workspaces for your Add-On

Divide Workspaces among up to 4 Tabbed Sections

Option Switches can also store the setting in a browser cookie across sessions.