Category Archives:

New Sample Magazine

newsample_cover

READ ONLINE NOW

Our first “Sample Magazine” was released with Ryuzine back in 2011, so with the launch of version 1.0 it was overdue for an update!   This NEW “Sample Magazine” is not only designed to inspire ideas and show off what is possible with Ryuzine, it also has real articles for you to read. The old one was mostly just a demonstration of layout techniques with no actual articles.

If you’re interested in publishing your own digital magazines in Ryuzine format you can download the Ryuzine Publisher Distribution Kit, which contains all of the source files used to create this sample publication.  You can open it up in Ryuzine Writer, play with it, and really see how it went together.  Not sure you’re ready to download?  Try out the ONLINE DEMO instead 😉

Compatibility

The Ryuzine web apps are designed to work in modern web browsers on current platforms. They are typically backwards compatible a browser version or two but generally will not work in legacy browsers or on obsolete platforms.

Ryuzine Press Plugin

The Ryuzine Press plugin is compatible with:

  • WordPress 3.5+
  • ComicPress 2.9+
  • Webcomic 3.0.10+
  • Easel 2.0.7 (with Comic Press Lite)

Ryuzine Reader & Ryuzine Rack

  • Apple Safari 5 (Mac OS X 10.6.8 or later)
  • Google Chrome 30+ (Windows XP or later, Mac OS X 10.6.8 or later, Linux 3.0+)
  • Firefox 20+ (Windows XP or later, Mac OS X 10.6.8 or later, Linux 3.0+)
  • Opera 20+ (Windows XP or later, Mac OS X 10.7 or later , Linux 3.0+)
  • Internet Explorer 9* or later (Windows XP or later, Internet Explorer 10+ recommended)
  • Microsoft Edge (Windows 10)
  • Mobile Safari (iOS 7.1 or later)
  • Android Browser (Android 2.3 or later, Android 4.0+ recommended)*
  • Chrome Mobile (Android 4.0 or later)
  • Internet Explorer Mobile (Windows Phone 7.5+)*
  • Silk Browser (FireOS 4.1+)

* Browser does not support some of the features or functionality but web app is usable.

The Ryuzine webapps may still function in earlier versions of the browsers than those listed, but earlier versions are no longer targets for functionality and future webapp releases will not be tested in them.

Resources

These additional Ryuzine resources are also available:

Official Stable Releases

The official stable releases of the Ryuzine web apps are available for download from the Ryu Maru website. These are pre-configured, bundled versions suitable for general users.

Ryuzine Publisher Distribution Kit

Ryuzine Press Plugin for WordPress

Source Code

The source code may have fixes and features not found in the stable releases, but are neither preconfigured nor bundled. You can’t just download the repositories and have a functioning version of the Ryuzine web apps, as some assembly and configuration is required first to make them work. These downloads are suitable for developers, not general users.

Ryu Maru on GitHub

Other Documentation

Ryuzine Writer 1.0 Publisher’s Manual – how to use the stand-alone Ryuzine Writer authoring webapp.

Ryuzine 1.0 Add-Ons Wiki – details on how to create optional add-ons for the Ryuzine webapps.

Ryuzine Document Specification Wiki – details on the document structure required to convert into a Ryuzine Reader publicaiton.

Feedback/Bug Reports

If you discover an issue with any of the Ryuzine web apps you should report it in the appropriate Ryu Maru GitHub repository for that web app.

Social Media

Connect to and follow Ryu Maru on Facebook, Google+, and Twitter.

+Webcomic

Webcomic is another popular WordPress plugin for creating and managing web comics.  After downloading, installing, and activating the Webcomic plugin you will see a new admin menu item named “Webcomic” appear.  In Ryuzine Press it doesn’t matter if you are using a Webcomic-compatible theme or if you have ticked the “Integrate” option in the Webcomic Settings.  Remember that Ryuzine Press exists alongside of and independently of any WordPress theme you are using.

Assigning Comics to Editions

Once your comic posts are in place assigning them to a Ryuzine Press Edition is as simple as categorizing any regular blog posts – in fact you can mix them in the same edition.  Create your Ryuzine Press Edition and assign it to an existing Ryuzine Issue (or create an Issue specifically for this Edition).  Then simply go to Webcomic > Webcomics and find the comics you want to assign in the list.  Using the “Edit” link open the comic post and look for the “Ryuzine Issues” list on the right.  If it isn’t there you may need to go to “Screen Options” at the top and enable it.  Once you’ve got it, tick the box for the Issue corresponding with the Ryuzine Press Edition.  Note that doing this may unlink the comic image from the post.  If that happens use the “Webcomic” sub-section (below the main post box) to re-link the correct image to the post.

Do the same for all the comics and/or blog posts you want to assign to the edition, remembering they will be displayed oldest to newest.  This is usually the preferable order since most people using Webcomic to post ongoing stories will have posts in that chronological order, and the WordPress archive pages usually show them newest to oldest, but in “comic reading order” they need to be oldest to newest.

Note that this all works much better if you are posting comic PAGES rather than comic STRIPS.  If your work is in strip format you may want to consider creating images with multiple strips and posting them as “pages” or there may be a lot of white space below a relatively small bit of artwork.

If you are switching from either ComicPress or Easel to Webcomic as your platform Ryuzine Press Editions can simultaneously display mixed posts from Webcomic and either ComicPress or Easel.

Covers & Pages

If you want to use the oldest post assigned to an Edition as the cover you will need to configure “Cover Source” under Ryuzine Press > Options > Covers.  Realize that this is a global setting affecting ALL your Ryuzine Press Editions.

Under the “Pages” tab you can also decide whether or not to show or hide bylines and dates, meta data, and/or comments.  There is also an option specific to comic posts that will suppress any related post text.  Use this option if you want a cleaner appearance more like reading a real comic book.

You can also add Issue-Specific styling to the Ryuzine Press Edition (in the last custom box) to hide all the headers, leaving just an empty top margin, which makes it look even more like a real comic book.

If you are not using the oldest post for the cover you can use the auto-generated covers.  You may find these are more flexible in that you can have a single image to overlay on all covers as a masthead and use CSS and media queries to place “full-bleed” cover artwork, and you can tag back-up stories or non-comic content with your “featured” category as well and have them automatically turned into clickable links on the cover.

+ComicPress

Read_Everywhere

ComicPress posts in a Ryuzine Press Edition, adapting to different screen sizes and orientations on mobile devices.
(Artwork by Jon Sloan, www.sa-bomjimcomic.com) 

The Ryuzine Press Plugin was created from the start with ComicPress integration in mind.  ComicPress is a popular theme system for WordPress which makes it easy to publish and manage a webcomics blog.

Upload your comic pages and (optionally) create a post to go with them as you would normally do with ComicPress.  It is recommended you use ComicPress Manager plugin to help, but is not required.

Assigning Comics to Editions

Once your comic posts are in place assigning them to a Ryuzine Press Edition is as simple as categorizing any regular blog posts – in fact you can mix them in the same edition.  Create your Ryuzine Press Edition and assign it to an existing Ryuzine Issue (or create an Issue specifically for this Edition).  Then simply go to Posts > All Posts and find the comics you want to assign in the list.  Using the “Quick Edit” link and tick the box for the Issue corresponding with the Ryuzine Press Edition.  Do the same for all the comics and/or blog posts you want to assign to the edition, remembering they will be displayed oldest to newest.  This is usually the preferable order since most people using ComicPress to post ongoing stories will have posts in that chronological order, and the WordPress archive pages usually show them newest to oldest, but in “comic reading order” they need to be oldest to newest.

Note that this all works much better if you are posting comic PAGES rather than comic STRIPS.  If your work is in strip format you may want to consider creating images with multiple strips and posting them as “pages” or there may be a lot of white space below a relatively small bit of artwork.  Ryuzine Press now explicitly excludes ComicPress Flash/Motion comics and galleries.  Single pages are the only thing that works.

Covers & Pages

If you want to use the oldest post assigned to an Edition as the cover you will need to configure “Cover Source” under Ryuzine Press > Options > Covers.  Realize that this is a global setting affecting ALL your Ryuzine Press Editions.

Under the “Pages” tab you can also decide whether or not to show or hide bylines and dates, meta data, and/or comments.  There is also an option specific to ComicPress posts that will suppress any related post text.  Use this option if you want a cleaner appearance more like reading a real comic book.

You can also add Issue-Specific styling to the Ryuzine Press Edition (in the last custom box) to hide all the headers, leaving just an empty top margin, which makes it look even more like a real comic book.

If you are not using the oldest post for the cover you can use the auto-generated covers.  You may find these are more flexible in that you can have a single image to overlay on all covers as a masthead and use CSS and media queries to place “full-bleed” cover artwork, and you can tag back-up stories or non-comic content with your “featured” category as well and have them automatically turned into clickable links on the cover.

WordPress Widgets

List Widget

Ryuzine Press has it’s own custom WordPress widget for displaying a list of Editions. It can also display a link to the Ryuzine Rack Newsstand (if you’ve installed it to the theme) and highlight the cover art for you latest Edition.  You’ll find it under:

Appearance > Widgets > Ryuzine Press Editions

Just add it to the sidebar in which you want the list of published Editions to appear.

RyuzinePressEditionsWidget

It has a few options:

  • Heading: It normally has the header “Ryuzine Press Editions” but you can customize it to say something else here (particularly if you need it in another language).
  • Hide widget if there is no content? If you don’t have any Editions published yet, or have deleted all your Editions for some reason checking this box will prevent it from showing an empty widget.
  • Display only on the home page? – If you want to restrict this list so it is only shown on your blog’s home page tick this checkbox.
  • Order Oldest to Newest (default) – determines if the list is ordered “ascending” or “descending”
  • Show n Editions – Enter “-1” to show all Ryuzine Press Editions in the list, or some other specific number of them to show.
  • Cover Art Thumbnails – determines which Editions show cover art thumbnails (if any):
    • “Newest Only” will only show a cover for the most recent Edition (of those displayed).
    • “All Cover Art” will show cover thumbnails for every Edition (of those being displayed).
    • “No Cover Art” will show only text links for however many Editions are displayed.
  • Restrict Cover Thumbnail Size? – if “Show Cover” is checked and this is checked too it will use the settings in the next row:
  • Thumbnail Size (in pixels) either “High” or “Wide” – (NEW in 0.9.6.7) if size restriction is enabled the image will be scaled to whatever pixel size you set.  If you size by width the height is automatic, if you size by height the width is automatic, to maintain the image aspect ratio.  Note that this can be over-ridden by any CSS classes you might have set for images in your sidebar.

The following options only appear if you have “Ryuzine Rack” enabled on your blog:

  • Ryuzine Rack Heading: Normally this says “Ryuzine Rack” but you can customize it to say something else (for example “Library” or “Store”).  This becomes the link to your newsstand.
  • Show link to Ryuzine Rack? – Tick this box to determine if the link to the Ryuzine Rack webapp is shown or not (over-rides any Ryuzine Rack Heading you set).

Note: If you restrict the size of a cover thumbnail but type non-numeric characters in the box it will use the default size (125 pixels).  If you leave the box empty it ignores the restriction and uses the actual image size (unless CSS image classes for your sidebar over-ride it).  The cover thumbnail is also given the class “ryucover” if you want to create custom styling for it.

Social Widget

share_panel

The Ryuzine webapp has a built-in option for your readers to share your publications on social networks or via email in the “Share Panel.”  If you don’t configure anything it will use the default “Social Widget” add-on which provides the social media sharing features you most likely want.

However, you can use any WordPress plugin social media widget instead.  The “Share Panel” is set up as a “sidebar” in the WordPress Appearance > Widgets section and you can just drag and drop a social network widget into the Ryuzine Share Bubble box (technically you can put any widget you like in the bubble, but it was intended for social networking).  In particular the share bubble works with Marijn Ronge’s Social Sharing Toolkit widget.

Press_Share_Widget

You can also paste social-networking code snippets into the box, for example those from Add This or Share This,  and they should work.  The “Share Bubble” will expand to contain whatever you drop into it, but you may not like the spacing or background color, etc., in which case you can also drop the “Text” widget into it and add <style>….</style> code to alter the appearance of the bubble or the widget content inside of it.

Note: you could also use other social media add-ons for the Ryuzine webapp itself, however at the time of this writing the default “Social Widget” add-on is the only one available.  How to create your own Ryuzine add-ons is beyond the scope of this manual.

Tools: Rack Builder

The RyuzineRack newsstand is an optional webapp which replaces the standard Ryuzine archive page in WordPress. It will automatically include all your published Ryuzine Press Editions. However, you can also include additional content by appending the main catalog and/or creating additional catalogs.  There will always be one Catalog you cannot delete, but it doesn’t need to have anything in it either.

Press_RackDataTab

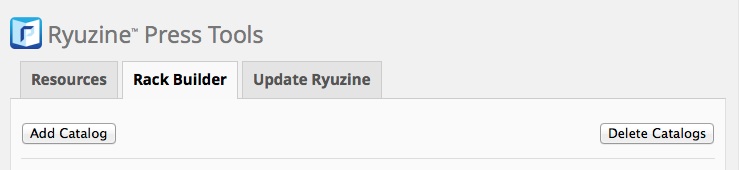
Adding and Deleting catalogs is as easy as anything else in WordPress.  Just press the “Add Catalog” or “Delete Catalog” buttons.  The default catalog will always be appended to the end of the automatically generated entries for your Ryuzine Press Editions.  However, any catalogs you manually add offer the option to “append” them or make them a “separate” catalog:rackcatalog_append

If you want to delete a catalog you’ve added press the “Delete” button at the top of the Tools section and a small box opens up with a list of all the extra catalogs by whatever names you gave them.  Select the checkbox(es) for the one(s) you want to get rid of and press the “Delete Checked” button – and heed the warning that it cannot be undone!

If you “append” the tables to the main catalog the items listed in them will just be added to that main catalog.  If you set them as a “separate” catalog, though, they will appear in the newsstand app’s “Sort List” panel.  If an end-user selects them the main catalog is unloaded and the selected catalog is loaded.  Users can only search or sort across a single catalog at a time.

Note: there is also a text link that reads “Hide Intro Text” which will hide the large block of explanatory text above the default Catalog table.  Once you start adding items and catalogs it can be annoying to have all that text taking up space so just go ahead and hide it.

What goes into a Catalog?

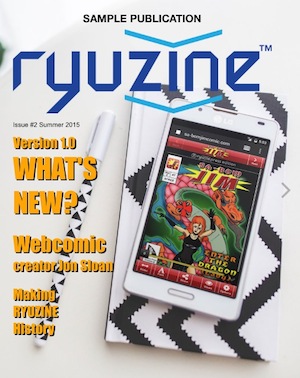
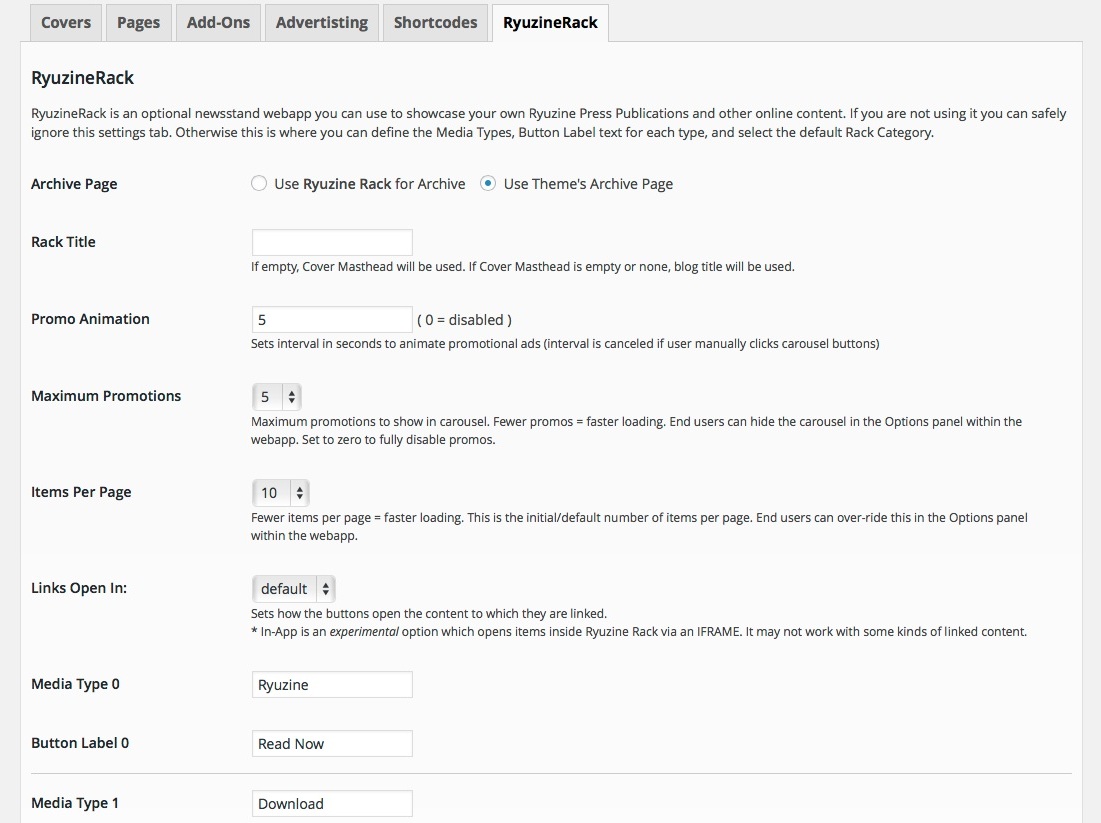
A catalog might contain links to store pages for print publications, or downloadable PDF files, and you can divide up the content into individual catalogs focused on a single year, title, media type, etc. Each catalog can also have an optional “masthead” image, which is displayed above the first page of newsstand items.

Additional items might include links to other websites, Ryuzine publications on other websites, links to store pages for print publications, downloads, etc.

Below you can see the Data Builder for the default catalog (which is always appended to the Ryuzine Press Edition archive data). The Catalog Names appear in the reader’s “Sort List” panel, as do the sortable column names (in bold black text in the table headers).
rack_builder

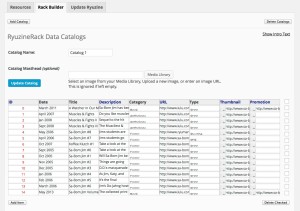
The drop-down lists for “Category” and “Type” are defined in the Options panel, as they are part of the Configuration File.

The  arrow button in the table item rows will open the “Media Library” to select an image for the Cover Thumbnail or a Promotion Banner. You can also simply enter the word “auto” and RyuzineRack will automatically build a promotional layout for that item. However, to prevent too many items from being shown as promos it will always show the newest item as a promo, and then up to five additional items with promos, selected newest to oldest (or however many promos you set as minimum in Options > Ryuzine Rack.

Note that the Catalog files do not contain any actual image or document files.  Much like any database they can only hold text string data such as the URL to an image or a document type or category.

Cover and Promo images are scaled to fit the Ryuzine Rack layout, but they are scaled preserving the original aspect ratio.  Cover thumbnails are scaled to 150 pixels wide and Promo Banners are scaled to 600 pixels wide (75px and 300px for mobile portrait view).  If you are using the shortcode that cover image will be automatically used for the cover thumbnail of that Ryuzine Press Edition in Ryuzine Rack.  The Rack Catalog Builder is for adding content that is not a Ryuzine Press Edition.

Options: Ryuzine Rack

RyuzineRack is an optional newsstand webapp you can use to showcase your own Ryuzine Press Publications and other online content. If you are not using it you can safely ignore this settings tab. Otherwise this is where you can define the Media Types, Button Label text for each type, and the media categories.

rack_options

Promo Animation – if there are at least 5 promotions in the carousel at the top of the newsstand they will auto-rotate on whatever interval you set in seconds.  If you want to disable the animation set it to zero.

Maximum Promotions – it obviously doesn’t make sense to make a promotion for everything.  Ideally you only want it to promote your most recent and/or best content.  Select the maximum number of promotions in the drop-down list.  Note that the newest item in your catalog will always automatically be promoted.

Link Opens –  option sets how linked content from Ryuzine Rack opens when a user presses the buttons below a cover thumbnail or in an information card. The default behavior can vary, for example:

  1. Within the web browser the default is to open links in the same window. This replaces Ryuzine Rack with the linked content. If a user goes back to
    Ryuzine Rack it needs to reload the webapp.
  2. Within iOS “app view” (when bookmarked to the Home Screen and run from there) the default is to open links in a new window within Mobile Safari. iOS
    will switch from the “app view” Ryuzine Rack to the opened content in Mobile Safari.

The linkOpens option accepts a value corresponding to the following:

  • 0 = default – usually within the same window, except as noted above.
  • 1 = _self – forces link open in the same window, even in iOS “app view”
  • 2 = _blank – forces link open in a new window.
  • 3 = _parent – same as _self unless Ryuzine Rack was inside a frame in which case it opens in that frame’s parent frame.
  • 4 = _top – same as _self unless Ryuzine Rack was inside a frame in which case it opens in the window holding the frame.
  • 5 = an in-app experimental method that opens content within Ryuzine Rack

Older versions of Ryuzine Rack, and newer versions linked to an old configuration file, will simply ignore this setting and open content in the same window. On iOS devices if “native scrolling,” “iScroll,” and “Zoom & Pan” are all disabled a javascript method for linking is substituted.

The experimental “in-app” method (setting 5) builds an IFRAME within the Lightbox Gallery and then opens the linked content in that IFRAME. It also adds an overlay control at the center top allowing users to “Go Back to Rack” which closes the lightbox, unloads the IFRAME, and returns to the Ryuzine Rack list. If the document at which you are currently looking is not on your “Reading List” there is an “Add” button to do so. In tablet and desktop views it will also display thumbnail images of the covers of items that are on your “Reading List,” allowing you to click the cover images to load those items in the “in-app” window. Known problems include:

  • May break some secure sites that will not work inside an IFRAME
  • May require different touch gestures for interaction (depending on the device)
  • Using the browser’s bookmark/favorites control will likely only mark Ryuzine Rack – not the opened content (though the in-app Bookmarking and Sharing will point to the correct document)
  • The browser’s “Back” button will will load the site before Ryuzine Rack, not return the user to Ryuzine Rack from opened content.
  • On low-end devices there may also be a serious performance hit because it is still running Ryuzine Rack underneath the other content
  • May crash some mobile browsers by exceeding the cache limit
  • It attempts to shift user focus to the opened content, but it is still possible in-app keyboard shortcuts will be controlling Ryuzine Rack (underneath) instead of the loaded Content (on top) until the user interacts with the opened content by mouse or touch

This method does, however, keep users at your web domain regardless of where the content you are linking to is hosted, and it also means returning to Ryuzine Rack doesn’t require reloading the entire webapp (as it was never closed). But the aforementioned possible issues are why we’re calling this method “experimental” right now. As with all the linkOpens options, earlier versions of Ryuzine Rack will simply ignore this setting.

Items Per Page – this sets the default number of items to show per page.  The more items you show the longer it will take the app to load, but too few items may cause your catalog to have too many pages.  End users have the ability to customize this to their own liking in the Options panel, you’re just declaring the starting number of items to display.

Media Types – the “Media Type/Button Label” pairs determine what types of media appear on the drop-down list in the “Rack Catalog Builder” and the button label determines what text appears on the button under the cover thumbnail for that type of media when it is shown in the newsstand’s sort results.  The media type also appears as a link in the item details which users can select to search the catalog for only items of that type.

Rack Categories – You can define as many Rack Categories as you want (it’s under Ryuzine Press > Rack Categories).  These will automatically appear as a drop-down list on the Rack Options page where you can set one of them as the default media category.  These same drop-down options appear on the Rack Catalog Builder for each row, and as a meta-box with radio button selectors on the Edit page for Ryuzine Press Editions (but only if you’ve actually installed Ryuzine Rack to your current theme).